Ruby on Railsで動的に追加・削除可能な入力フォームの実装手順

はじめに
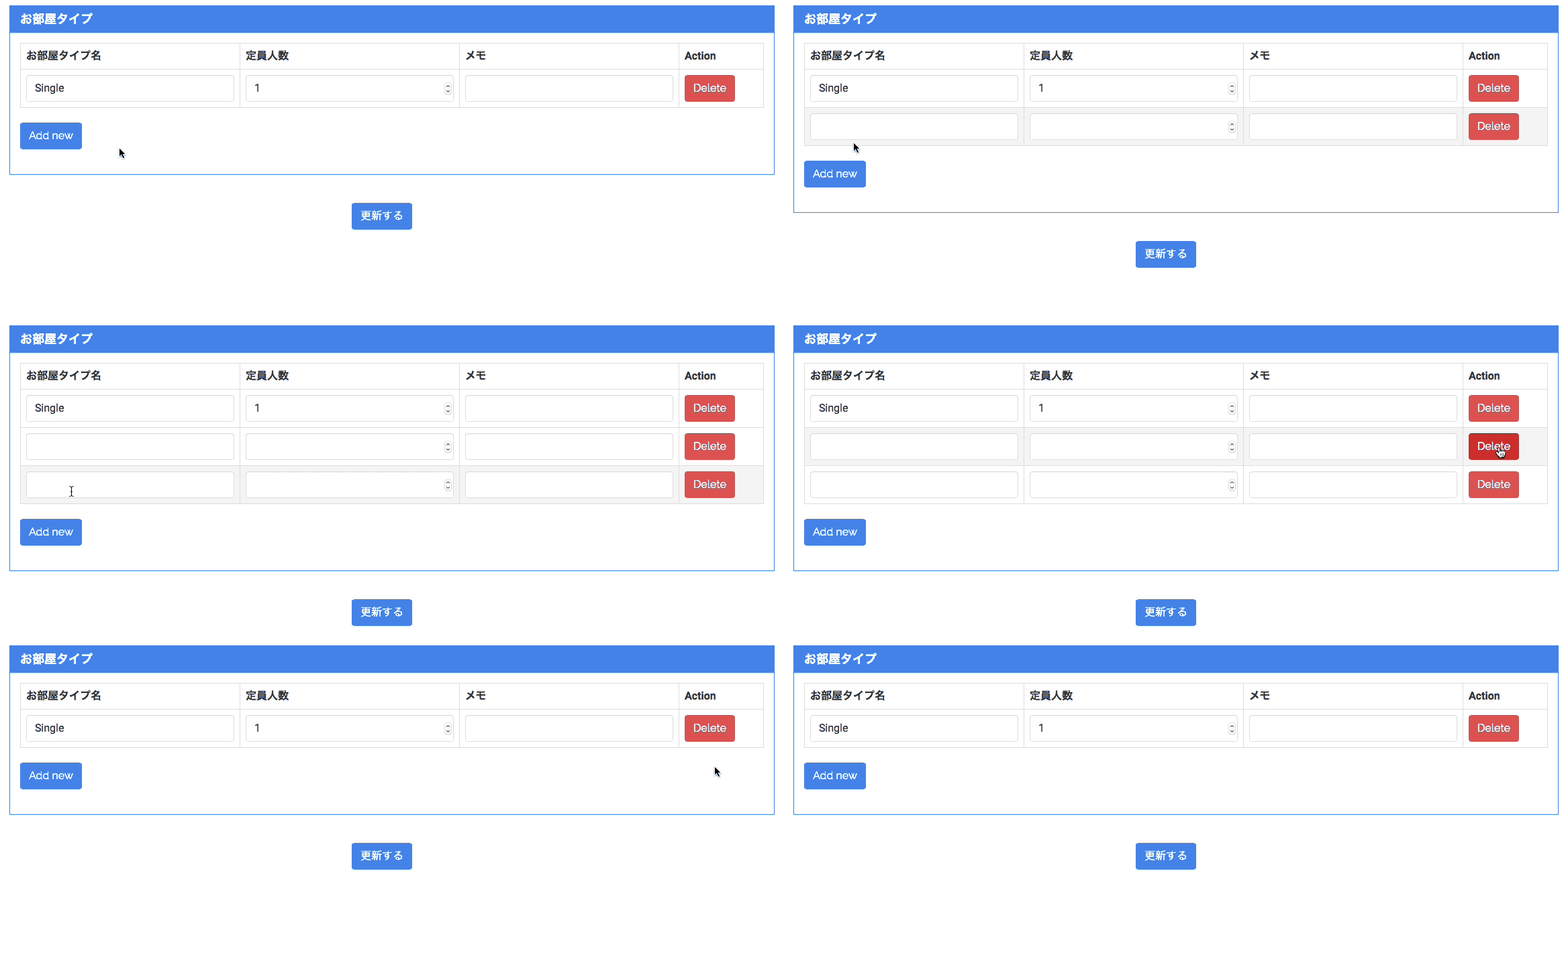
Ruby on Railsで作成したWebアプリで動的に入力フォームを追加したり削除したりできるようにしたのでその手順をメモします。なお、ここではテーブルの各セルが入力フォームとなっているような場合に、新しい入力フォームとなる行を動的に追加したり、削除したりできるようにしています。また、親モデルと子モデルにはhas_may関係があります。以下が動作イメージです。
 「Add new」ボタンをクリックするとテーブルに新しい行が入力フォームとして追加されます。また、各行のActionカラムにある「Delete」をクリックすると、その行を削除します。
今回は以下URLの「nested_form_fields」というgemを使用しており、実装手順も以下URLに書いてある手順を参考にしています。
ncri/nested_form_fields | GitHub
環境と前提
- Rails 4.2.0
- Ruby 2.2.2
nested_form_fieldsのインストール
まずはじめに「nested_form_fields」というGemを導入します。以下をGemfileに追記して
インストールします。
そして以下をapp/assets/javascripts/application.jsに追記します。
これで「nested_form_fields」のインストールは完了です。
Viewの編集
ここではHotelモデルの編集画面にて、子モデルであるRoomtypeモデルの入力フォームを動的に追加、削除できるようにします。そのためにedit.html.erbを以下のように編集します。
上記のnested_fields_forからRoomtypeモデルのフォーム生成部分になります。そしてremove_nested_fields_linkは入力フォームを削除するためのボタン、add_nested_fields_linkは入力フォームを新規追加するためのボタンを生成します。注意点は以下の3点です。
- 動的に追加したいフォームの要素を
wrapper_tag:で指定すること。例えば上記の例ではwrapper_tag:としてtrを指定しています。これによってnested_fields_forの中にあるtd要素を含むtr要素が生成されます。 remove_nested_fields_linkはnested_fields_forの中に配置することadd_nested_fields_linkはnested_fields_forの外に配置すること
f.nested_fields_forに対応する部分として以下のようなHTMLが生成されます。
Controllerの編集
「nested_fields_for」が動作するには、以下のようにidと_destoryをそれぞれStrong Parametersで許可する必要があります。Controllerの編集はこれだけです。
Modelの編集
モデルではaccepts_nested_attributes_forの部分を追記します。
以上で完了です。もし間違いやより良い方法などがありましたら教えて頂ければと思います。
関連記事
 公開日:2019/10/04 更新日:2019/10/04
RailsとSendGridでメール送信処理を実装する
Ruby on RailsからAction Mailerを使用してSendGrid経由でメールを送信する処理を実装したのでその手順をまとめます。
 公開日:2018/05/30 更新日:2018/05/30
ブラウザの操作を自動化できるSeleniumをWSLからRubyで使う
フォーム送信や繰り返し行う必要があるブラウザ操作を自動化できるSeleniumをWindows Subsystem for Linux のUbuntuからRubyを用いて使用するための手順をメモします。
 公開日:2018/05/27 更新日:2018/05/27
rbenvとruby環境の構築手順
WindowsのWindows Subsystem for LinuxでUbuntuを使いはじめ、その中にrbenvとRuby環境を構築したのでその手順をメモします。なお、UbuntuであればWindows Subsystem for Linux、仮想マシン、純粋なUbuntuのいずれでも同じ手順になります。思っていた以上に簡単に構築できました。
 公開日:2018/05/06 更新日:2018/05/06
RubyでGoogleスプレッドシートを読み込み・書き込みする
Googleスプレッドシートを自分で作成したRubyコードから読み込んだり、書き込んだりするためのコードについてまとめます。
 公開日:2016/01/10 更新日:2016/01/10
Railsでwickedpdfを使ってPDF出力する
Ruby on RailsでPDF出力させるのに便利なgemはたくさんありますが、htmlをそのままPDF化してくれる「wickedpdf」が一番お手軽で楽でした。wickedpdfの導入手順と使用方法をメモします。