1つのコードでWeb、iOS、Androidアプリを作成できるIonicをWindows10で使うまでの手順

公開日:2018/09/10 更新日:2018/09/10
1つのコードでWeb、iOS、Androidアプリを作成できるIonicをWindows10で使うまでの手順のサムネイル

はじめに

Ionicは、Webアプリ、Android、iOSアプリをHTML、CSS、Javascriptでで作成するためのフレームワークです。Ionic Frameworkともよばれます。これまではAndroidならばJava、iOSならばSwiftまたはObjective-Cといったように、それぞれのプラットフォーム毎に異なる言語を用いて開発する必要があったことを考えるとその便利さがわかると思います。ここでは実際にIonicを使って公式に用意されているスターターアプリを作成し、Webブラウザで動作確認するまでの手順をメモします。

できるようになること

以下のように、スターターアプリとして用意されているサイドメニューが実装されたWebアプリをブラウザからアクセスして動作確認を行います。このアプリがiOSやAndroidでも動作しますが、iOSなどでの動作確認方法は別記事にまとめています。詳しくは後述します。

output_big.gif

Ionicとは

冒頭でも述べたように、異なる複数のプラットフォーム上で動作するアプリをWeb技術(HTML、CSS、Javascript)で作成するためのフレームワークです。厳密ではありませんが、極端に言ってしまうとHTML、CSS、Javascriptで1つのコードを書けば、それがWeb、iOS、Androidのいずれでも動作するアプリとして使用できるようになります。もう少し具体的には、AngularJSとCordovaがメインで使用されています。詳し調べたい方は、以下にいくつかの参考サイト様を載せます。大変勉強になりました。 ハイブリッドアプリ入門 [cordova ionic] - Qiita

前提と環境

Windows10に直接Ionicをインストールせず、Windows10にVagrantをインストールしてVagrant上で動作するUbuntu16.04にIonicを導入します。Windows10にGit for Windowsを導入し、直接Ionicをインストールする方法もありますが、個人的にはVagrant環境がすでに整備されており楽だったためVagrantを使用します。

Ionicをインストール

ここでは、Windows10とVagrant上のUbuntu用に共有フォルダとして設定している/vagrant配下にionicというディレクトリを作成し、そこで作業します。(特に共有フォルダ上で作業する必要があるということではありません。)Node.jsがインストールされていれば以下のコマンド1つでインストール完了です。

/vagrant/ionic
$ npm install -g ionic
npm WARN deprecated socks@1.1.10: If using 2.x branch, please upgrade to at least 2.1.6 to avoid a serious bug with socket data flow and an import issue introduced in 2.1.0
/home/vagrant/.nvm/versions/node/v8.11.4/bin/ionic -> /home/vagrant/.nvm/versions/node/v8.11.4/lib/node_modules/ionic/bin/ionic
+ ionic@4.1.2
added 230 packages in 30.043s
Plain text

試しにionicコマンドを実行してみると、以下のように使い方が表示されます。

/vagrant/ionic
$ ionic

   _             _
  (_) ___  _ __ (_) ___
  | |/ _ \| '_ \| |/ __|
  | | (_) | | | | | (__
  |_|\___/|_| |_|_|\___|  CLI 4.1.2


  Usage:

    $ ionic  [] [--help] [--verbose] [--quiet] [--no-interactive] [--no-color] [--confirm] [options]

  Global Commands:

    config  ...... Manage CLI and project config values (subcommands: get, set, unset)
    docs ..................... Open the Ionic documentation website
    info ..................... Print project, system, and environment information
    login .................... Login to Ionic Pro
    logout ................... Logout of Ionic Pro
    signup ................... Create an account for Ionic Pro
    ssh  ......... Commands for configuring SSH keys (subcommands: add, delete, generate, list, setup, use)
    start .................... Create a new project

  Project Commands:

    You are not in a project directory.
  
Plain text

これでIonicのインストールは完了です。

スターターアプリを作成する

Ionicでは、いくつかのスターターアプリが用意されています。スターターアプリとは、いわゆるテンプレートのことであり、最初からいくつかの機能が実装されています。具体的には、実装されている機能によって複数用意されており、以下の6個が用意されています。

tabs 簡単なタブが実装されたアプリ
blank 何も実装されていないまっさらなアプリ
sidemenu サイドメニュー機能が実装されているアプリ
super スライダーやその他アプリでよく見る基本的な機能が実装されています。
tutorial ほとんどsidemenuと同じです。
aws こちら- ionic-angular AWS Mobile Hub Starterを使ってみた - Qiitaに大変わかりやすくまとめられていました。

こちらの公式ドキュメントconferenceというスターターアプリも記載がありますが、現在はなくなっているようです。以下のように、myAppという適当なアプリ名を指定してionic startコマンドを実行すればアプリの作成が開始されます。ここでどのスターターアプリを使用するかが聞かれ選択できます。なお、このアプリ名と同じ名前のディレクトリが作成されます。

$ ionic start myApp
Let's pick the perfect starter template! 💪

Starter templates are ready-to-go Ionic apps that come packed with everything you need to build your app. To bypass this
prompt next time, supply template, the second argument to ionic start.

? Starter template: (Use arrow keys)
❯ tabs     | A starting project with a simple tabbed interface
  blank    | A blank starter project
  sidemenu | A starting project with a side menu with navigation in the content area
  super    | A starting project complete with pre-built pages, providers and best practices for Ionic development.
  tutorial | A tutorial based project that goes along with the Ionic documentation
  aws      | AWS Mobile Hub Starter
Plain text

矢印キーで好きなスターターアプリを選択してEnterキーを押せば作成されます。なお、インストール中に以下の質問が聞かれます。

  • ./myApp exists. Overwrite?
  • 「既存のアプリを上書きするか?」の意味です。もしすでに同じアプリ名(ディレクトリ名)が存在している場合は、以下のように上書きするか聞かれます。新規に作成する場合は聞かれません。yで上書きできます。なお、上書きすると当然ながらすでに存在しているデータをすべて上書きして消してしまうので注意してください。
  • Integrate your new app with Cordova to target native iOS and Android?
  • 「新しく作成するアプリをCordvaを使ってiOSとAndroidに対応させるか?」の意味です。yでOKです。
  • Install the free Ionic Pro SDK and connect your app?
  • 「Ionic Pro SDKをインストールし、あなたのアプリに接続するか?」という意味です。 今回はIonic Pro SDKを使用しないため、ここではnでOKです。

なお、以下のように最初からスターターアプリ名を指定してアプリを新規作成することもできます。以下は上記の質問含む表示内容です。終わるまでに少し時間がかかります。

/vagrant/ionic
$ ionic start myApp sidemenu
? ./myApp exists. Overwrite? Yes
✔ Preparing directory ./myApp - done!
✔ Downloading and extracting sidemenu starter - done!
? Integrate your new app with Cordova to target native iOS and Android? Yes
> ionic integrations enable cordova --quiet
[INFO] Downloading integration cordova
[INFO] Copying integrations files to project
[OK] Integration cordova added!

Installing dependencies may take several minutes.

     ✨   IONIC  DEVAPP   ✨

 Speed up development with the Ionic DevApp, our fast, on-device testing mobile app

  -  🔑   Test on iOS and Android without Native SDKs
  -  🚀   LiveReload for instant style and JS updates

 -->    Install DevApp: https://bit.ly/ionic-dev-app    <--

────────────────────────────────────────────────────────────

> npm i
npm WARN deprecated browserslist@2.11.3: Browserslist 2 could fail on reading Browserslist >3.0 config used in other tools.
npm WARN deprecated hoek@2.16.3: The major version is no longer supported. Please update to 4.x or newer

> node-sass@4.9.0 install /vagrant/ionic/myApp/node_modules/node-sass
> node scripts/install.js

Downloading binary from https://github.com/sass/node-sass/releases/download/v4.9.0/linux-x64-57_binding.node
Download complete  ] - :
Binary saved to /vagrant/ionic/myApp/node_modules/node-sass/vendor/linux-x64-57/binding.node
Caching binary to /home/vagrant/.npm/node-sass/4.9.0/linux-x64-57_binding.node

> uglifyjs-webpack-plugin@0.4.6 postinstall /vagrant/ionic/myApp/node_modules/uglifyjs-webpack-plugin
> node lib/post_install.js


> node-sass@4.9.0 postinstall /vagrant/ionic/myApp/node_modules/node-sass
> node scripts/build.js

Binary found at /vagrant/ionic/myApp/node_modules/node-sass/vendor/linux-x64-57/binding.node
Testing binary
Binary is fine
npm notice created a lockfile as package-lock.json. You should commit this file.
npm WARN optional SKIPPING OPTIONAL DEPENDENCY: fsevents@1.2.4 (node_modules/fsevents):
npm WARN notsup SKIPPING OPTIONAL DEPENDENCY: Unsupported platform for fsevents@1.2.4: wanted {"os":"darwin","arch":"any"} (current: {"os":"linux","arch":"x64"})

added 710 packages in 388.175s
> git init
Initialized empty Git repository in /vagrant/ionic/myApp/.git/

     🔥   IONIC  PRO   🔥

 Supercharge your Ionic development with the Ionic Pro SDK

  -  ⚠️   Track runtime errors in real-time, back to your original TypeScript
  -  📲  Push remote updates and skip the app store queue

 Learn more about Ionic Pro: https://ionicframework.com/pro

────────────────────────────────────────────────────────────

? Install the free Ionic Pro SDK and connect your app? (Y/n)

> git add -A
> git commit -m "Initial commit" --no-gpg-sign

*** Please tell me who you are.

Run

  git config --global user.email "you@example.com"
  git config --global user.name "Your Name"

to set your account's default identity.
Omit --global to set the identity only in this repository.

fatal: empty ident name (for ) not allowed
[WARN] Error encountered during commit. Disabling further git operations.

[INFO] Next Steps:

       - Go to your newly created project: cd ./myApp
       - Get Ionic DevApp for easy device testing: https://bit.ly/ionic-dev-app
Plain text

最後にgitについて登録するよう指示が記載されていますが、ここではひとまず無視して続けます。これでスターターアプリの作成は完了です。

Webブラウザで動作確認する

実際に作成したアプリを動作させてみます。まず、上記のionic startコマンドによって作成されたアプリ名のディレクトリに移動し、serveコマンドを実行します。

$ cd myApp
$ ionic serve
> ionic-app-scripts serve --address 0.0.0.0 --port 8100 --livereload-port 35729 --dev-logger-port 53703 --nobrowser
[app-scripts] [06:54:35]  ionic-app-scripts 3.2.0
[app-scripts] [06:54:35]  watch started ...
[app-scripts] [06:54:35]  build dev started ...
[app-scripts] [06:54:35]  clean started ...
[app-scripts] [06:54:35]  clean finished in 10 ms
[app-scripts] [06:54:35]  copy started ...
[app-scripts] [06:54:36]  deeplinks started ...
[app-scripts] [06:54:36]  deeplinks finished in 16 ms
[app-scripts] [06:54:36]  transpile started ...
[app-scripts] [06:54:43]  transpile finished in 7.13 s
[app-scripts] [06:54:43]  preprocess started ...
[app-scripts] [06:54:43]  preprocess finished in 4 ms
[app-scripts] [06:54:43]  webpack started ...
[app-scripts] [06:54:43]  copy finished in 7.60 s
[app-scripts] [06:54:47]  webpack finished in 4.16 s
[app-scripts] [06:54:47]  sass started ...
[app-scripts] [06:54:49]  sass finished in 2.42 s
[app-scripts] [06:54:49]  postprocess started ...
[app-scripts] [06:54:49]  postprocess finished in 22 ms
[app-scripts] [06:54:49]  lint started ...
[app-scripts] [06:54:49]  build dev finished in 14.09 s
[app-scripts] [06:54:50]  watch ready in 14.27 s

[INFO] Development server running!

       Local: http://localhost:8100
       External: http://10.0.2.15:8100, http://192.168.56.11:8100
       DevApp: myApp@8100 on local

       Use Ctrl+C to quit this process

[INFO] Browser window opened to http://localhost:8100!

[app-scripts] [06:54:58]  lint finished in 8.17 s

Plain text

上記のように表示されれば完了です。上記表示の中にある以下の記載は各環境によるアクセス方法を指示しています。

       Local: http:/ /localhost:8100
       External: http://10.0.2.15:8100, http:/ /192.168.56.11:8100
       DevApp: myApp@8100 on local
Plain text

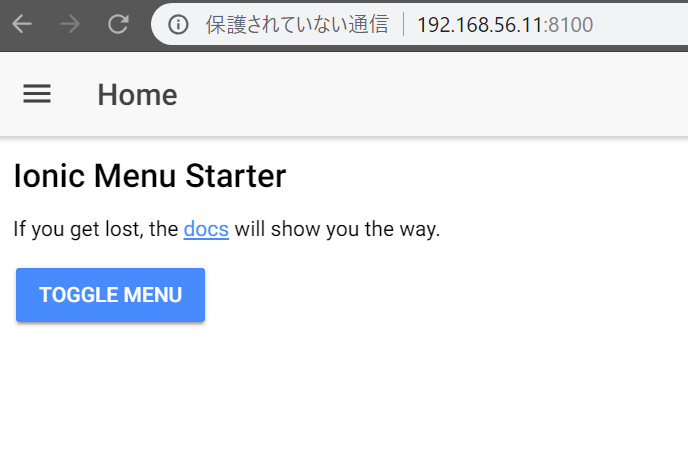
これは、ローカル環境からならばhttp://localhost:8100、外部からならばhttp://10.0.2.15:8100, http://192.168.56.11:8100でブラウザからこのアプリにアクセスできることを意味しています。そこでWindows10のブラウザからhttp://192.168.56.11:8100にアクセスしてみます。なお、ここでの192.168.56.11というIPアドレスは、Vagrant上で動作しているUbuntuのIPアドレスになります。そのため、各自の環境によって異なります。また、もし今回のようにWindows10+Vagrant上の仮想マシンを使わずにWindows10やMac OS、Linuxなどに直接Ionicをインストールして上記作業を実施した場合は、http://localhost:8100でもアクセスできます。ここではWindos10 + Vagrant上のUbuntuでIonicを動作させているため、Windows10から見ればUbuntuはローカルマシンではないため、http://localhost:8100ではアクセスできません。

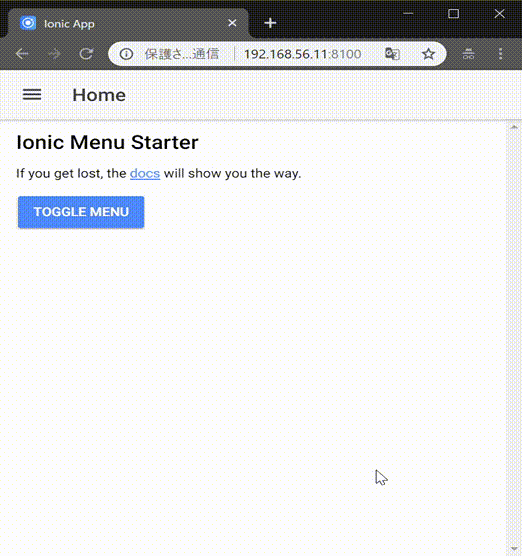
アクセスすると以下のように表示されます。以下はスターターアプリとしてsidemenuを選択した場合です。

ionic-dev1.png

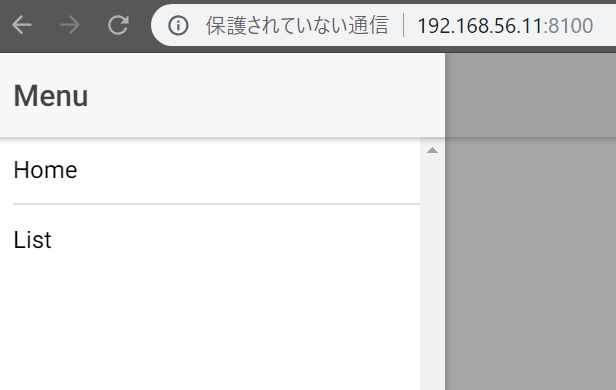
以下のようにサイドバーが実装されており動作します。 ionic-dev-sidebar.png

iOS、Android実機で動作確認する

iOS、Android実機での動作確認を行いたい場合は、DevAppを使うのが最も簡単です。DevAppの使用方法については以下の別記事にまとめましたので必要な方は見てみてください。

実機でのアプリ動作確認が簡単にできるIonic DevAppの使い方

より簡単にiOSやAndroidで作成したアプリの動作確認をおこなう手段として、Ionic公式のDevAppという動作確認用アプリが提供されています。ここではこのDevAppを使ってiPhone実機で動作確認するまでの手順をメモします。なお、この手順自体はAndroidの場合でも同じになります。


まとめ

Ionicを使用することで、iOSやAndroidそれぞれのアプリを別の言語で開発することなく共通の言語でまとめて作成することができます。どれぐらいの規模や複雑さのアプリにもよりそうですが、ひとまずプロトタイプを作成する目的ならば非常に便利に感じました。また色々と実際に使ってみてまとめます。

開発アプリ

nanolog.app

毎日の小さな出来事をなんでも記録して、ログとして残すためのライフログアプリです。