VirtulBox上のfedora20にGuest Additionsがインストールできない場合の対処方法
Virtualbox上のfedora20にGuest Additionsをインストールしようとしたら、エラーが出てうまくいかなかったので、その対処方法をメモします。
環境
- VirtulBoxバージョン : 4.3.6
- 仮想マシン : Fedora 20
- ホストマシン : Mac OS X 10.9.1
出たエラー
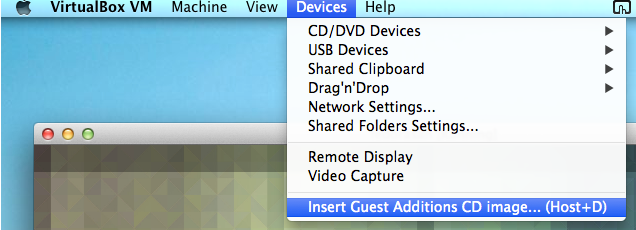
以下のようにVirtulboxのメニューバーの[Devices]-[Install Guest Additions CD image...(Host+D)](日本語だと[Guest Additionsのインストール])をクリックした後、
fedora上に以下の画面が出るので、「Run」を押してGuest Additionsをインストールしようとしたところ
インストール中に以下のようなメッセージが出ました。
Verifying archive integrity... All good.
Uncompressing VirtualBox 4.3.6 Guest Additions for Linux............
VirtualBox Guest Additions installer
Removing installed version 4.3.6 of VirtualBox Guest Additions...
Copying additional installer modules ...
Installing additional modules ...
Removing existing VirtualBox DKMS kernel modules [ OK ]
Removing existing VirtualBox non-DKMS kernel modules [ OK ]
Building the VirtualBox Guest Additions kernel modules
The headers for the current running kernel were not found. If the following
module compilation fails then this could be the reason.
The missing package can be probably installed with
yum install kernel-devel-3.11.10-301.fc20.x86_64
Building the main Guest Additions module [失敗]
(Look at /var/log/vboxadd-install.log to find out what went wrong)
Doing non-kernel setup of the Guest Additions [ OK ]
Installing the Window System drivers
Installing X.Org Server 1.14 modules [ OK ]
Setting up the Window System to use the Guest Additions [ OK ]
You may need to restart the hal service and the Window System (or just restart
the guest system) to enable the Guest Additions.
Installing graphics libraries and desktop services componen[ OK ]
Press Return to close this window...
見て分かるように以下の部分が問題のようです。
Building the main Guest Additions module [失敗]
このエラーに対する対処方法を以降にメモします。
対処方法
必要なソフトウェアが無い、カーネルのバージョンが最新でないことが原因である場合があるようので、まず以下のコマンドを実行後、fedoraを再起動します。以降のコマンドは全てroot権限で行っています。
# yum update kernel*
# yum install kernel-devel kernel-headers dkms gcc gcc-c++
続いて以下のコマンドを実行して、カーネルを確認し、表示されたカーネルバージョンをexportします。
# ls /usr/src/kernels
3.12.9-301.fc20.x86_64
# KERN_DIR="/usr/src/kernels/3.12.9-301.fc20.x86_64"
# export KERN_DIR
# printenv KERN_DIR
/usr/src/kernels/3.12.9-301.fc20.x86_64
改めて仮想マシンメニューの[Devices]-[Install Guest Additions CD image...(Host+D)]で、インストールCDイメージをマウントします。また、以下のコマンドでインストールCDイメージを適当なディレクトリにマウントして、VBoxLinuxAdditions.runを実行すればOKでした。以下の中の /media/VirtualBoxGuestAdditions/ というディレクトリは、私があらかじめ作成したディレクトリです。
# mount /dev/cdrom /media/VirtualBoxGuestAdditions/
mount: /dev/sr0 is write-protected, mounting read-only
# cd /media/VirtualBoxGuestAdditions/
# ls
32Bit VBoxLinuxAdditions.run VBoxWindowsAdditions.exe
64Bit VBoxSolarisAdditions.pkg autorun.sh
AUTORUN.INF VBoxWindowsAdditions-amd64.exe cert
OS2 VBoxWindowsAdditions-x86.exe runasroot.sh
# ./VBoxLinuxAdditions.run
Verifying archive integrity... All good.
Uncompressing VirtualBox 4.3.6 Guest Additions for Linux............
VirtualBox Guest Additions installer
Removing installed version 4.3.6 of VirtualBox Guest Additions...
Copying additional installer modules ...
Installing additional modules ...
Removing existing VirtualBox DKMS kernel modules [ OK ]
Removing existing VirtualBox non-DKMS kernel modules [ OK ]
Building the VirtualBox Guest Additions kernel modules [ OK ]
Doing non-kernel setup of the Guest Additions [ OK ]
Starting the VirtualBox Guest Additions [ OK ]
Installing the Window System drivers
Installing X.Org Server 1.14 modules [ OK ]
Setting up the Window System to use the Guest Additions [ OK ]
You may need to restart the hal service and the Window System (or just restart
the guest system) to enable the Guest Additions.
Installing graphics libraries and desktop services componen[ OK ]
これまで[失敗]となっていた部分が以下のようにOKになっていれば正常にインストールできていると思います。
Building the VirtualBox Guest Additions kernel modules [ OK ]
ちなみに、[Devices]-[Install Guest Additions CD image...(Host+D)]をクリックして以下の画面で「Run」をクリックしてGuest Additionsをインストールした場合でも正常にインストールされるかは未確認です。
Guest Additionsが正常にインストールされたかの確認
以下のコマンドを実行して、以下のような内容が表示されればちゃんとGuest Additionsがインストールされています。何も表示されない場合はGuest Additionsがインストールされていないです。
# lsmod | grep -i box
vboxvideo 12658 0
drm 283349 1 vboxvideo
vboxsf 43786 1
vboxguest 231692 2 vboxsf
ちなみに、fedoraを再起動すると、Guest Additionsが無効になっているので、以下のコマンドを実行して有効化します。
$ sudo restorecon -R - v /opt
参考サイト
関連記事
- 公開日:2014/01/15 更新日:2014/01/15
VirtualBoxにおける仮想マシンの仮想ディスク容量を拡張するための手順
VirtualBoxで仮想マシンを使用していると、仮想ディスクの容量が不足してくることがあると思います。ここでは、このような場合に仮想マシンの仮想ディスク容量を拡張して増やすための手順をメモします。
- 公開日:2014/01/15 更新日:2014/01/15
VirtualBoxが仮想マシンの仮想ディスクなどを格納するフォルダの変更方法
VirtualBoxを使用していると、仮想マシンの仮想ディスクがハードディスクを圧迫してきます。この対策として、仮想マシンの仮想フォルダを、別のハードディスクや別のパーティションに変更することが挙げられます。ここではこの方法についてメモします。簡単です。