macOSでgcloudコマンドを使えるようにするまでの手順

はじめに
Google Cloud Functionsを使う必要がありgcloudコマンドをM1 Macにインストールしたのでその手順をまとめます。
前提と環境
- AppleシリコンM1端末
- お使いのMac端末にPythonがインストールされている必要があります。
- 公式ドキュメントによると、
gcloudの対応バージョンはPython 3(3.5~3.8、3.7 を推奨)と Python 2(2.7.9 以降)です。 - 以下の公式ドキュメントに従った手順になります。公式ドキュメント
ちなみに、インストールされているPythonのバージョンは以下で確認できます。もし表示されない場合はまずPythonをインストールする必要があります。
$ python -V
Python 2.7.18
ライブラリをダウンロード
公式ドキュメントにあるように、以下のようにダウンロードします。

ここではApple M1 シリコン用のもの(上記画像内のmacOS 64ビット(arm64, Apple M1 シリコン))をダウンロードします。
公式ドキュメントによると、ダウンロードしたファイルをホームディレクトリに展開することを推奨と書かれているため、ダウンロードしたものをホームディレクトリに移動します。ここでは、ダウンロードしたファイルが~/Downloadsにある前提です。
$ cd ~/Downloads
$ mv ~/Downloads/google-cloud-sdk-370.0.0-darwin-arm.tar.gz ~/
$ cd ~/
続いて以下のようにtarコマンドで解凍します。
$ tar -zxvf ./google-cloud-sdk-370.0.0-darwin-arm.tar.gz
するとgoogle-cloud-sdkというディレクトリがホームディレクトリに作成されます。
以下のようにこのディレクトリに移動し、インストール用のスクリプトinstall.shを実行します。
すると以下のようにWelcome to the Google Cloud SDK!と表示されます。
$ cd google-cloud-sdk
$ ./install.sh
Welcome to the Google Cloud SDK!

To help improve the quality of this product, we collect anonymized usage data
and anonymized stacktraces when crashes are encountered; additional information
is available at <https://cloud.google.com/sdk/usage-statistics>. This data is
handled in accordance with our privacy policy
<https://cloud.google.com/terms/cloud-privacy-notice>. You may choose to opt in this
collection now (by choosing 'Y' at the below prompt), or at any time in the
future by running the following command:

    gcloud config set disable_usage_reporting false

Do you want to help improve the Google Cloud SDK (y/N)?N
上記は、Google Cloud SDKの改善のための匿名データの収集を許可するかの確認になります。ここでは拒否のためにNと入力してEnterを押下します。
すると以下のようにいまからインストールするライブラリの一覧が表示されます。長いので最終部分だけ記載しています。
...省略
 Not Installed    │ kubectl                                              │ kubectl                  │  < 1 MiB │
│ Not Installed    │ kubectl-oidc                                         │ kubectl-oidc             │ 18.4 MiB │
│ Not Installed    │ pkg                                                  │ pkg                      │          │
└──────────────────┴──────────────────────────────────────────────────────┴──────────────────────────┴──────────┘
To install or remove components at your current SDK version [370.0.0], run:
  $ gcloud components install COMPONENT_ID
  $ gcloud components remove COMPONENT_ID

To update your SDK installation to the latest version [395.0.0], run:
  $ gcloud components update


Modify profile to update your $PATH and enable shell command completion?

Do you want to continue (Y/n)?Y
上記は、gcloudコマンドを使用できるようにするために環境変数を更新していいかの確認です。Yと入力してEnterを押下し続けます。
続いて以下のようにどのターミナルの設定ファイルに環境変数を追記していいかの確認がきます。
以下の場合は/Users/mymac/.zshrcに環境変数を追記することになります。
The Google Cloud SDK installer will now prompt you to update an rc file to bring the Google Cloud CLIs
 into your environment.

Enter a path to an rc file to update, or leave blank to use [/Users/mymac/.zshrc]:
Enter押すと以下のように表示されて完了です。念のために.zshrcのバックアップとして.zshrc.backupを作成したと書かれています。
Backing up [/Users/mymac/.zshrc] to [/Users/mymac/.zshrc.backup].
[/Users/mymac/.zshrc] has been updated.

==> Start a new shell for the changes to take effect.


For more information on how to get started, please visit:
  https://cloud.google.com/sdk/docs/quickstarts
ターミナルを再起動するか、以下のコマンドを実行して.zshrcの変更を再読み込みします。
$ source ~/.zshrc
インストールが正常にできて再読み込みできていれば、以下のようにgcloudコマンドを実行でき、バージョンを確認できます。
$ gcloud -v
Google Cloud SDK 370.0.0
bq 2.0.73
core 2022.01.21
gsutil 5.6
初期設定をおこなう
gcloudコマンドの対象となるプロジェクトやアカウントの初期設定をおこなっておきます。
以下のコマンドを実行して初期設定を行います。
$ gcloud init
Welcome! This command will take you through the configuration of gcloud.

Your current configuration has been set to: [default]

You can skip diagnostics next time by using the following flag:
  gcloud init --skip-diagnostics

Network diagnostic detects and fixes local network connection issues.
Checking network connection...done.
Reachability Check passed.
Network diagnostic passed (1/1 checks passed).

You must log in to continue. Would you like to log in (Y/n)?Y
Yを入力してEnterを押下します。
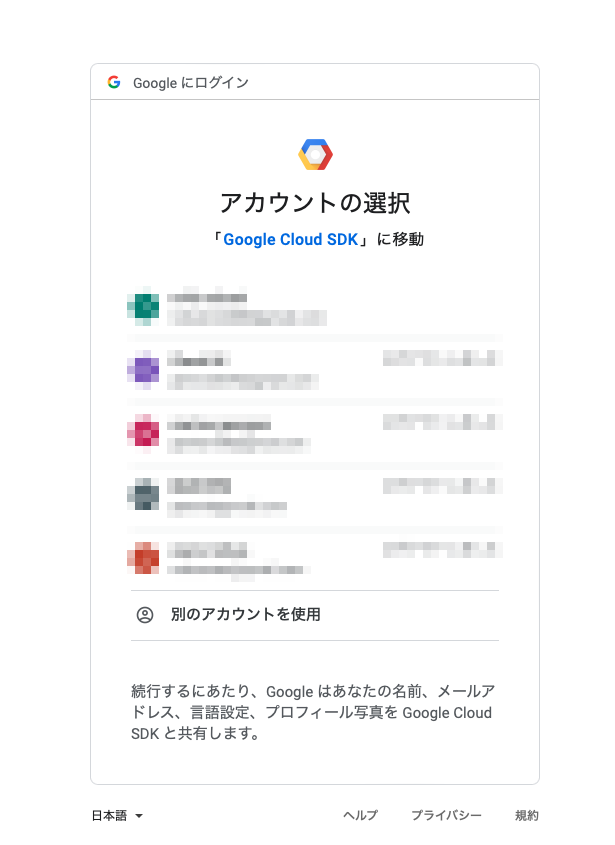
すると、下のようにデフォルトのブラウザが開き、ログインするGoogleアカウントを選択するための画面が表示されますので、選択します。
ちなみにターミナルでは以下のように表示されています。
Your browser has been opened to visit:

    https://accounts.google.com/o/oauth2/auth?response_type=code&client_id=3234234234.apps.googleusercontent.com&redirect_uri=http%3A%2F%2Flocalhost%3A8085%2F&scope=openid+https%3A%2F%2Fwww.googleapis.com%2Fauth%2Fuserinfo.email+https%3A%2F%2Fwww.googleapis.com%2Fauth%2Fcloud-platform+https%3A%2F%2Fwww.googleapis.com%2Fauth%2Fappengine.admin+https%3A%2F%2Fwww.googleapis.com%2Fauth%2Fcompute+https%3A%2F%2Fwww.googleapis.com%2Fauth%2Faccounts.reauth&state=&access_type=offline&code_challenge=_k&code_challenge_method=S256
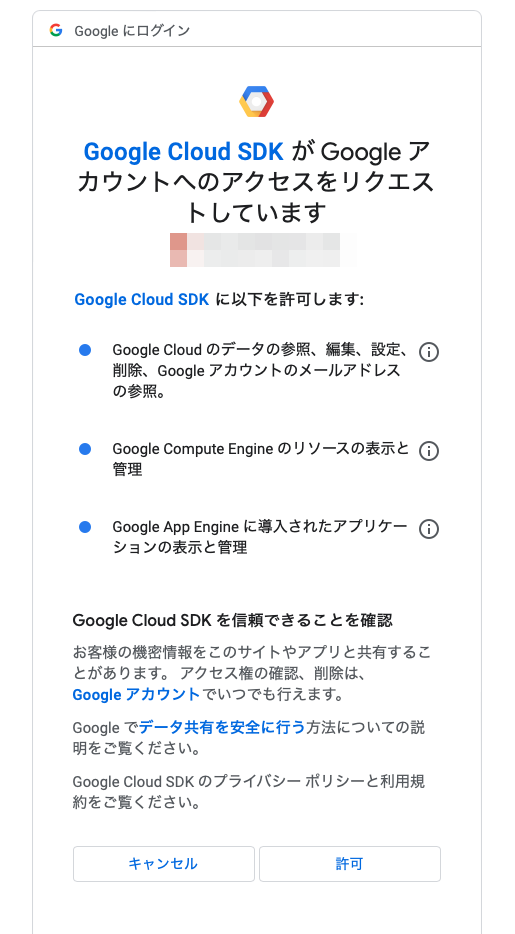
選択してパスワードを入力し、ログインすると以下のように表示されますので、「許可」をクリックします。
すると、以下のようにgcloudで操作したい自分のプロジェクトを選択するよう表示されます。
Updates are available for some Cloud SDK components.  To install them,
please run:
  $ gcloud components update

You are logged in as: [your@gmail.com].

Pick cloud project to use:
 [1] bionc-test-192823
 [2] my-first-project-1928282
 [3] my-first-project-2938382
 [4] Create a new project
Please enter numeric choice or text value (must exactly match list item):
上記のように一覧が表示されるので、操作したいプロジェクトの番号を入力してEnterします。
そして以下のように表示されて完了です。ここではbionc-test-192823を選択しました。
Your current project has been set to: [bionic-test-192823].

Not setting default zone/region (this feature makes it easier to use
[gcloud compute] by setting an appropriate default value for the
--zone and --region flag).
See https://cloud.google.com/compute/docs/gcloud-compute section on how to set
default compute region and zone manually. If you would like [gcloud init] to be
able to do this for you the next time you run it, make sure the
Compute Engine API is enabled for your project on the
https://console.developers.google.com/apis page.

Created a default .boto configuration file at [/Users/mymac/.boto]. See this file and
[https://cloud.google.com/storage/docs/gsutil/commands/config] for more
information about configuring Google Cloud Storage.
Your Google Cloud SDK is configured and ready to use!

* Commands that require authentication will use your@gmail.com by default
* Commands will reference project `bionic-test-192823` by default
Run `gcloud help config` to learn how to change individual settings

This gcloud configuration is called [default]. You can create additional configurations if you work with multiple accounts and/or projects.
Run `gcloud topic configurations` to learn more.

Some things to try next:

* Run `gcloud --help` to see the Cloud Platform services you can interact with. And run `gcloud help COMMAND` to get help on any gcloud command.
* Run `gcloud topic --help` to learn about advanced features of the SDK like arg files and output formatting
以上でgcloudコマンドのインストール完了です。
gcloudでよく使うコマンド
最後に使うことが多いコマンドを少しだけ記載します。
gcloudの設定状況を表示する
$ gcloud config list
以下が実行結果です。使用中のGoogleアカウント、選択中のプロジェクト名などが表示されます。
[core]
account = your@gmail.com
disable_usage_reporting = True
project = bionic-test-192823

Your active configuration is: [default]
プロジェクト一覧を表示する
$ gcloud projects list
以下が実行結果です。以下のようにPROJECT_ID、NAME、PROJECT_NUMBERが表示されます。
$ gcloud projects list
PROJECT_ID                NAME               PROJECT_NUMBER
bionic-test-192823        My First Project   28282973743674
my-first-project-1928282  Secret project     37659712340812
...以降省略....
プロジェクトを切り替える
$ gcloud config set project <project-id>
以下が実行結果です。
$  gcloud config set project my-first-project-1928282
Updated property [core/project].
まとめ
公式ドキュメントが充実しているので特に困ることなくインストールできるかと思います。