脆弱性スキャナのVulsをUbuntuにインストールする手順
はじめに
Linuxサーバーの脆弱性をスキャンしてレポートを確認できる脆弱性スキャナであるVulsをUbuntuにインストールしたのでその手順をまとめます。
Vulsについて
VulsはLinuxサーバで使用できるエージェントレスの脆弱性スキャナです。VulsはGo言語で開発されており、以下がVulsのリポジトリです。
Agent-less vulnerability scanner for Linux, FreeBSD, Container Image, Running Container, WordPress, Programming language libraries, Network devices
前提と環境
この記事ではUbuntu 18.04にVulsをインストールしました。
- OS : Ubuntu 18.04
- Vulsを動かすサーバーのメモリが最低2GB以上必要
以降の手順は、以下のVulsの公式ドキュメントと記事を参考にしました。
Vuls is an open-source, agentless vulnerability scanner written in Go.
事前準備
まずapt updateしておきます。
$ sudo apt update
続いてVulsの動作に必要なパッケージをインストールします。VulsはGoで開発されているためGo言語関連のパッケージになります。
$ sudo apt install sqlite git debian-goodies gcc make wget golang-go -y
Vulsのデータを格納するためのディレクトリを作成し、そのディレクトリの所有者を一般ユーザ(ここではmyuserとします。)に変更します。
$ sudo mkdir /usr/share/vuls-data
$ sudo chown -R myuser /usr/share/vuls-data
Go用にパスを追加します。.bashrcに以下を追記します。
export GOPATH=$HOME/go
export PATH=$PATH:$GOPATH/bin
.bashrcを再読込みして上記の変更を反映させます。
$ source .bashrc
NVDアクセス用にgo-cve-dictionaryをインストールする
NVD(National Vulnerability Database)は、アメリカ国立標準技術研究所(National Institute of Standards and Technology、通称NIST)が管理している脆弱性情報データベースです。世界中の脆弱性情報をデータベース化して管理されています。脆弱性をスキャンするためにVulsではこのNVDをローカルにダウンロードして照合をおこないます。そのために必要なライブラリがgo-cve-dictionaryです。このインストール手順をまとめます。
まずgo-cve-dictionary用にディレクトリを作成し、そこに移動します。以下のkotakanbeはgo-cve-dictionaryの製作者の名前です。ここは公式ドキュメントにならっています。
$ mkdir -p $GOPATH/src/github.com/kotakanbe
$ cd $GOPATH/src/github.com/kotakanbe
go-cve-dictionaryをクローンします。
$ git clone https://github.com/kotakanbe/go-cve-dictionary.git
移動してコンパイル、インストールします。
$ cd go-cve-dictionary
$ make install
もし上記を実行した時にエラーが出る場合は、Goが古い可能性があります。詳しくはこの節の最後に載せています。
make installが完了後、システム全体で使えるようにするためにgo-cve-dictionaryを/usr/local/binにコピーします。
$ sudo cp $GOPATH/bin/go-cve-dictionary /usr/local/bin
また、ログ用にディレクトリを作成し、そのディレクトリの所有権と所有者を変更します。以下のmyuserは前述した一般ユーザです。
$ sudo mkdir /var/log/vuls
$ sudo chmod 700 /var/log/vuls
$ sudo chown -R myuser /var/log/vuls
そして以下のコマンドでNVDから実際に脆弱性情報データベースをダウンロードします。
$ for i in `seq 2002 $(date +"%Y")`; do sudo go-cve-dictionary fetchnvd -dbpath /usr/share/vuls-data/cve.sqlite3 -years $i; done
上記コマンドの意味は、2002年から現在の年(2020年)までの脆弱性情報をダウンロードするためのループ処理になっています。ダウンロードした脆弱性情報を/user/share/vuls-data/cve.sqlite3に保存しています。
なお、上記は完了に時間がかかります。私の環境では15分ほどかかりました。また、メモリが最低2GB以上ないと完了できません。以下のように順番にダウンロードが開始されます。
$ for i in `seq 2002 $(date +"%Y")`; do sudo go-cve-dictionary fetchnvd -dbpath /usr/share/vuls-data/cve.sqlite3 -years $i; done
INFO[01-05|21:35:19] Fetching... https://nvd.nist.gov/feeds/json/cve/1.0/nvdcve-1.0-2002.meta
INFO[01-05|21:35:19] Fetching... https://nvd.nist.gov/feeds/json/cve/1.0/nvdcve-1.0-modified.meta
INFO[01-05|21:35:19] Fetching... https://nvd.nist.gov/feeds/json/cve/1.0/nvdcve-1.0-recent.meta
INFO[01-05|21:35:21] Fetched... https://nvd.nist.gov/feeds/json/cve/1.0/nvdcve-1.0-2002.meta

// 途中省略

11 / 11 [-------------------------------------------------------------------------------------------] 100.00% ? p/s
INFO[01-05|22:10:53] Refreshed 0 NvdJSONs.
もし物理メモリが2GB以上ない場合は、スワップを作成して使っても大丈夫です。
make install時にエラーが出る場合
make installを実行した時に以下のエラーに遭遇しました。
$ make install
GO111MODULE=on go install -ldflags "-X 'main.version=v0.4.1' -X 'main.revision=4a02438'"
fetcher/jvn/xml/jvn.go:14:2: cannot find package "github.com/PuerkitoBio/goquery" in any of:
        /usr/lib/go-1.10/src/github.com/PuerkitoBio/goquery (from $GOROOT)
        /home/myuser/go/src/github.com/PuerkitoBio/goquery (from $GOPATH)

// 途中省略

db/db.go:10:2: cannot find package "github.com/pkg/errors" in any of:
        /usr/lib/go-1.10/src/github.com/pkg/errors (from $GOROOT)
        /home/myuser/go/src/github.com/pkg/errors (from $GOPATH)
GNUmakefile:31: recipe for target 'install' failed
make: *** [install] Error 1
上記エラーの原因は、Goのバージョンが古いことです。Ubuntuのバージョンによっては、aptを使ってGoをインストールすると、バージョンが1.10と古いものがインストールされます。
従ってもし上記エラーが出た場合は、最新のGoをインストールしてください。最新のGoをインストールする手順は以下にまとめたので必要な方は見てみてください。
LinuxでGo言語を使用したい場合に、各ディストリビューションのパッケージマネージャーからインストールすることもできますが、バージョンが少し古いことがあります。この記事では、最新版のGoをLinuxにインストールする手順をまとめます。
OVALアクセス用のgoval-dictionaryをインストールする
次にOVAL(Open Vulnerability and Assessment Language)のデータをダウンロードするために必要なgoval-dictionaryをダウンロード、インストールします。なお、OVALについては以下の記事が詳しいので見てみてください。
セキュリティ検査言語OVAL(Open Vulnerability and Assessment Language)は、コンピュータのセキュリティ設定状況を検査するための仕様です。
まず前節で作成したディレクトリに移動します。
$ cd $GOPATH/src/github.com/kotakanbe
そしてgoval-dictionaryをクローンし、そのディレクトリに移動します。
$ git clone https://github.com/kotakanbe/goval-dictionary.git
$ cd goval-dictionary
コンパイルしてインストールします。
$ make install
続いて以下でgoval-dictionaryを/usr/local/binにコピーします。
$ sudo cp $GOPATH/bin/goval-dictionary /usr/local/bin
そして以下でUbuntu 18.04用にOVALのデータをダウンロードします。
$ sudo goval-dictionary fetch-ubuntu -dbpath=/usr/share/vuls-data/oval.sqlite3 18
Ubuntu18.04以外のディストリビューションを使用している場合は、以下の公式ドキュメントにいくつかのディストリビューション用にコマンドが記載されているので見てみてください。
This is tool to build a local copy of the OVAL. The local copy is generated in sqlite format, and the tool has a server mode for easy querying.
ちなみに、上記を実行すると以下のように表示されてダウンロードが開始されていきます。
$ sudo cp $GOPATH/bin/goval-dictionary /usr/local/bin
myuser@si1-2292-12084:~/go/src/github.com/kotakanbe/goval-dictionary$ sudo goval-dictionary fetch-ubuntu -dbpath=/usr/share/vuls-data/oval.sqlite3 18
INFO[01-05|22:20:25] Fetching...                              URL=https://people.canonical.com/~ubuntu-security/oval/com.ubuntu.bionic.cve.oval.xml
INFO[01-05|22:20:34] Fetched...                               URL=https://people.canonical.com/~ubuntu-security/oval/com.ubuntu.bionic.cve.oval.xml
INFO[01-05|22:20:34] Finished fetching OVAL definitions
INFO[01-05|22:20:35] Fetched                                  URL=https://people.canonical.com/~ubuntu-security/oval/com.ubuntu.bionic.cve.oval.xml OVAL definitions=9205
INFO[01-05|22:20:36] Refreshing...                            Family=ubuntu Version=18
Vulsをインストールする
ようやくVulsのインストールです。Vulsをインストールするために、Vulsのソースを公式リポジトリからダウンロードします。ソースを置くためのディレクトリを作成し、クローンしてコンパイル、インストールするために以下を順番に実行します。
$ mkdir -p $GOPATH/src/github.com/future-architect
$ cd $GOPATH/src/github.com/future-architect
$ git clone https://github.com/future-architect/vuls.git
$ cd vuls
$ make install
ちなみに、make installの実行結果は以下のような表示でした。
$ make install

// 途中省略

+++ scan/debian_test.go 2020-01-05 22:26:14.577172836 +0900
@@ -1,9 +1,9 @@
 package scan

 import (
-       "sort"
        "os"
        "reflect"
+       "sort"
        "testing"

        "github.com/future-architect/vuls/cache"
GO111MODULE=on go install -ldflags "-X 'github.com/future-architect/vuls/config.Version=v0.9.1' -X 'github.com/future-architect/vuls/config.Revision=build-20200105_222504_c17b415'"
/usr/local/binにコピーしておきます。
$ sudo cp $GOPATH/bin/vuls /usr/local/bin
vuls-dataディレクトリに移動して、そこにVulsの設定ファイルconfig.tomlを作成します。以下はviエディタを使用していますが、nanoでも他のエディタでももちろんOKです。TOMLは設定ファイルのフォーマットの1つです。
$ cd /usr/share/vuls-data
$ sudo vi config.toml
config.tomlの中身は以下のようにします。
$[cveDict]
type = "sqlite3"
SQLite3Path = "/usr/share/vuls-data/cve.sqlite3"

[ovalDict]
type = "sqlite3"
SQLite3Path = "/usr/share/vuls-data/oval.sqlite3"

[servers]

[servers.localhost]
host = "localhost"
port = "local"
scanMode = [ "fast" ]
#scanMode = ["fast", "fast-root", "deep", "offline"]
上記のcveDictはgo-cve-dictionary、ovalDictはgoval-dictionaryのパスを指定します。
servers部分では脆弱性スキャンを実施する対象のサーバー情報です。Vulsはリモートサーバーでも実施できますが、ここではVulsをインストールしたサーバー自身をスキャン対象とするためlocalhostを指定しています。
また、scanModeはスキャンモードの選択です。選択できるモードは大体察しがつくかもしれませんが、詳細は以下の公式ドキュメントを見てみてください。
作成したconfig.tomlが問題ないか以下で確認します。
$ vuls configtest
以下のような内容が表示されればOKです。
$ vuls configtest
[Jan  5 22:30:34]  INFO [localhost] Validating config...
[Jan  5 22:30:34]  INFO [localhost] Detecting Server/Container OS...
[Jan  5 22:30:34]  INFO [localhost] Detecting OS of servers...
[Jan  5 22:30:34]  INFO [localhost] (1/1) Detected: localhost: ubuntu 18.04
[Jan  5 22:30:34]  INFO [localhost] Detecting OS of static containers...
[Jan  5 22:30:34]  INFO [localhost] Detecting OS of containers...
[Jan  5 22:30:34]  INFO [localhost] Checking Scan Modes...
[Jan  5 22:30:34]  INFO [localhost] Checking dependencies...
[Jan  5 22:30:34]  INFO [localhost] Dependencies... Pass
[Jan  5 22:30:34]  INFO [localhost] Checking sudo settings...
[Jan  5 22:30:34]  INFO [localhost] sudo ... No need
[Jan  5 22:30:34]  INFO [localhost] It can be scanned with fast scan mode even if warn or err messages are displayed due to lack of dependent packages or sudo settings in fast-root or deep scan mode
[Jan  5 22:30:34]  INFO [localhost] Scannable servers are below...
localhost
Vulsを使用してスキャンを実行する
以下のコマンドでスキャンを実行します。
$ vuls scan
以下が結果です。
$ vuls scan
[Jan  5 22:31:56]  INFO [localhost] Start scanning
[Jan  5 22:31:56]  INFO [localhost] config: /usr/share/vuls-data/config.toml
[Jan  5 22:31:56]  INFO [localhost] Validating config...
[Jan  5 22:31:56]  INFO [localhost] Detecting Server/Container OS...
[Jan  5 22:31:56]  INFO [localhost] Detecting OS of servers...
[Jan  5 22:31:56]  INFO [localhost] (1/1) Detected: localhost: ubuntu 18.04
[Jan  5 22:31:56]  INFO [localhost] Detecting OS of static containers...
[Jan  5 22:31:56]  INFO [localhost] Detecting OS of containers...
[Jan  5 22:31:56]  INFO [localhost] Checking Scan Modes...
[Jan  5 22:31:56]  INFO [localhost] Detecting Platforms...
[Jan  5 22:31:58]  INFO [localhost] (1/1) localhost is running on other
[Jan  5 22:31:58]  INFO [localhost] Detecting IPS identifiers...
[Jan  5 22:31:58]  INFO [localhost] (1/1) localhost has 0 IPS integration
[Jan  5 22:31:58]  INFO [localhost] Scanning vulnerabilities...
[Jan  5 22:31:58]  INFO [localhost] Scanning vulnerable OS packages...
[Jan  5 22:31:58]  INFO [localhost] Scanning in fast mode


One Line Summary
================
localhost       ubuntu18.04     738 installed
To view the detail, vuls tui is useful.
To send a report, run vuls report -h.
以下で詳細なレポートを確認できます。
$ sudo vuls tui
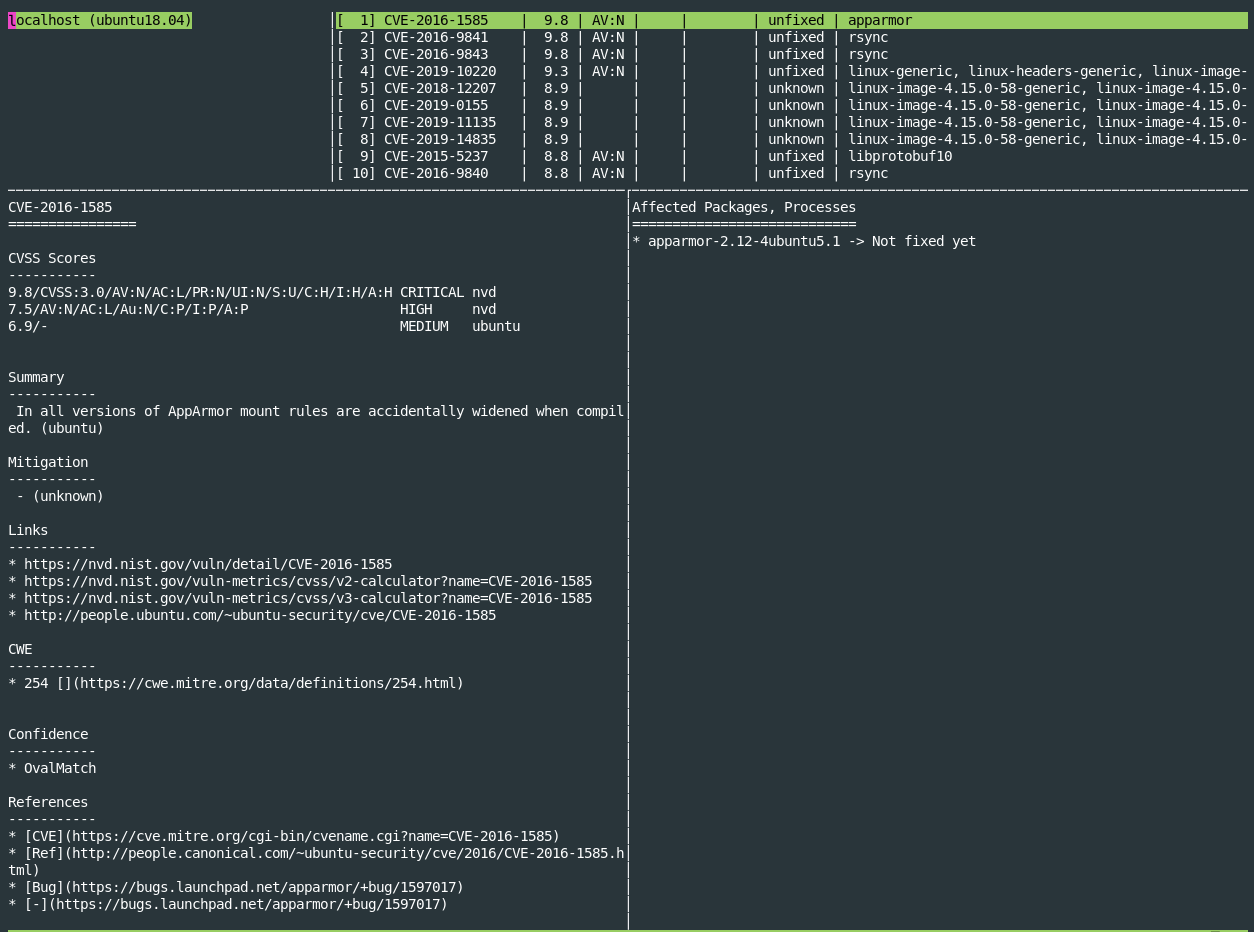
上記の実行結果は以下のように各脆弱性毎に確認できます。
Enterを押すとペインを移動できます。Ctrl + Cで開いたレポートを閉じることができます。
脆弱性数の要約を確認をしたい場合は以下のコマンドで確認できます。
$ sudo vuls report -format-one-line-text
One Line Summary
================
localhost       Total: 255 (High:14 Medium:79 Low:136 ?:26)     0/255 Fixed     739 installed   0 exploits      en: 0, ja: 0 alerts
config.tomlや実際のスキャンの確認方法については以下の公式ドキュメントを見てみてください。一部日本語化されています。
This tutorial will let you scan the vulnerabilities on the localhost with Vuls. This can be done in the following steps.
また、Vuls全体について以下のIPAのドキュメントにかなり詳しくまとめられているのでレポートの見方等については以下を見てみてください。
まとめ
脆弱性スキャナであるVulsをUbuntuにインストールする手順をまとめました。
関連記事
 公開日:2020/02/16 更新日:2020/02/16
圧縮、暗号化、リモート対応の差分バックアップを作成できる「Borg Backup」の使い方
圧縮、暗号化に対応し差分バックアップを作成できるソフトウェアである「Borg Backup」をUbuntuにインストールして使ってみたのでその手順をまとめます。「Borg Backup」はLinux、macOSに対応しています。
 公開日:2020/02/14 更新日:2020/02/14
自分専用の後で読むサービスを構築できる「Wallabag」をUbuntu + Nginxで構築する手順
後で読むサービスのPocketにかなり近く、機能豊富なオープンソースのWallabagをUbuntuにインストールしたのでその手順をまとめます。
 公開日:2020/02/12 更新日:2020/02/12
ファイル単位で暗号化して保存できるCryptomatorをインストールして使う手順
Cryptomatorは、ファイル単位での暗号化が可能なソフトウェアです。この記事では、UbuntuにCryptomatorをインストールする手順と使い方をまとめます。
 公開日:2020/01/22 更新日:2020/01/22
WireGuardでVPNサーバーを構築してスマホやPCから接続する手順
WireGuardはOpenVPNよりもシンプルで高速、より安全なVPNとして開発が進められており、OpenVPNに代わるVPNとして期待されています。この記事ではWireGuardを使ってVPNサーバーを構築し、そのVPNサーバーにUbuntuやiPhoneから実際に接続してみるまでの手順をまとめます。
 公開日:2020/01/17 更新日:2020/01/17
ディレクトリ表示や移動をインタラクティブに実行できるコマンドツール「Broot」
Linuxで端末を使っている時にディレクトリ構造をざっくり確認したり各ディレクトリにどのようなファイルが入っているかを確認したりしたい場合があると思います。Brootはディレクトリ構造を表示しつつさらにそこから各ディレクトリに移動したりファイルを検索したりできるコマンドラインツールです。
