Flutterでアプリ下部にナビゲーションメニューを設置するサンプル
公開日:2019/10/14 更新日:2019/10/14
Flutterでアプリ下部にナビゲーションメニューを設置するサンプルのサムネイル

sven-662061-unsplash.jpg Photo by Sven on Unsplash

はじめに

色々なスマホアプリでページ下部にメニューがあり、タップすると画面が切り替わる機能ががあります。ボトムナビゲーションメニュー等といい、Flutterでは、BottomNavigationBarPageViewを使うことで簡単に実装できます。この記事では、これらを使った簡単な例をまとめます。

できるようになること

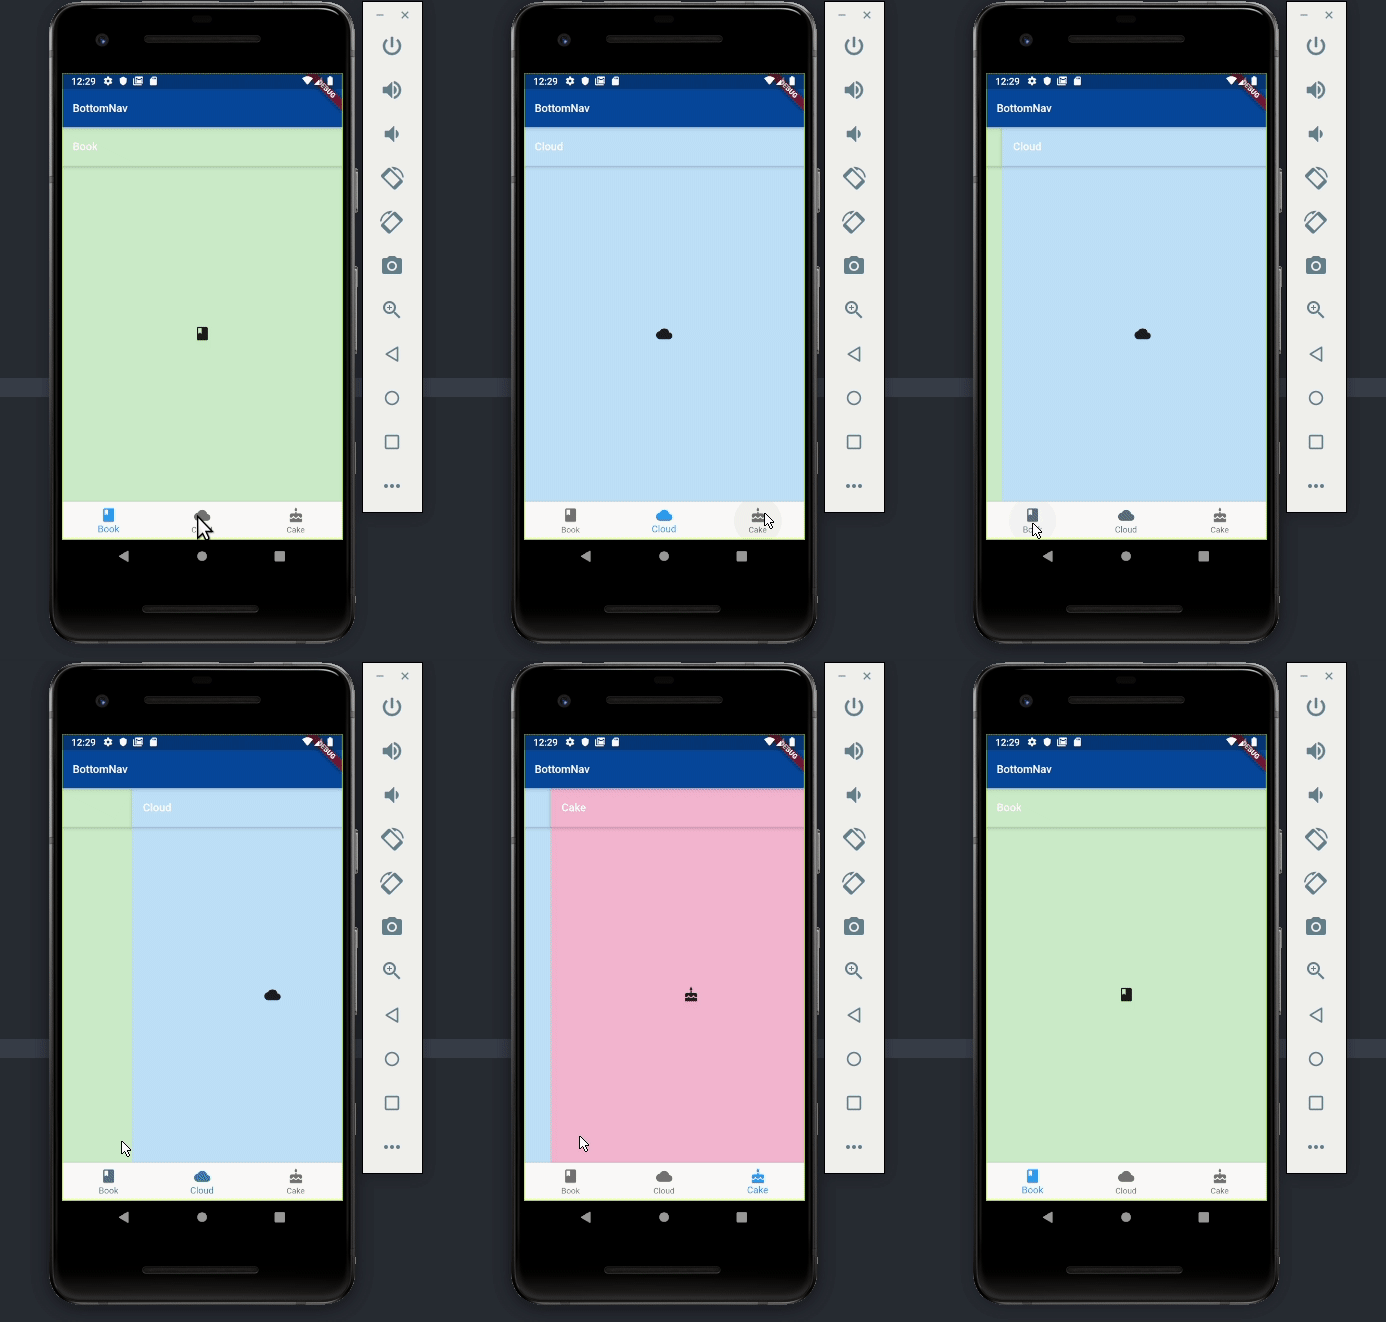
以下のGIF画像のように、アプリ下部にナビゲーションメニューがあり、タップしたり水平方向にページをスワイプすることでページを切り替えることができます。

demo-bottom-nav-flutter.gif

デモのサンプルコード

上記のGIF画像のデモのサンプルコードを以下に載せます。以下のコードの元はflutter createで作成したカウンターアプリです。BottomNavigationBarPageViewに関連する部分にはコメントを記載しています。

main.dartのコード

まずはじめにmain.dartです。

main.dart
import 'package:flutter/material.dart';
import './pages/BookScreen.dart';
import './pages/CakeScreen.dart';
import './pages/CloudScreen.dart';

void main() => runApp(MyApp());

class MyApp extends StatelessWidget {
  // This widget is the root of your application.
  
  Widget build(BuildContext context) {
    return MaterialApp(
      title: 'BottomNav',
      theme: ThemeData(
        primarySwatch: Colors.blue,
      ),
      home: MyHomePage(),
    );
  }
}

class MyHomePage extends StatefulWidget {
  
  _MyHomePageState createState() => _MyHomePageState();
}

// SingleTickerProviderStateMixinを使用。後述
class _MyHomePageState extends State
    with SingleTickerProviderStateMixin {
  // ページ切り替え用のコントローラを定義
  PageController _pageController;

  // ページインデックス保存用
  int _screen = 0;

  // ページ下部に並べるナビゲーションメニューの一覧
  List myBottomNavBarItems() {
    return [
      BottomNavigationBarItem(
        icon: Icon(Icons.book),
        title: const Text('Book'),
      ),
      BottomNavigationBarItem(
        icon: Icon(Icons.cloud),
        title: const Text('Cloud'),
      ),
      BottomNavigationBarItem(
        icon: Icon(Icons.cake),
        title: const Text('Cake'),
      ),
    ];
  }

  
  void initState() {
    super.initState();
    // コントローラ作成
    _pageController = PageController(
      initialPage: _screen, // 初期ページの指定。上記で_screenを1とすれば2番目のページが初期表示される。
    );
  }

  
  void dispose() {
    // コントローラ破棄
    _pageController.dispose();
    super.dispose();
  }

  
  Widget build(BuildContext context) {
    return Scaffold(
      backgroundColor: Colors.blue[900],
      // Appbar
      appBar: AppBar(
        backgroundColor: Colors.blue[900],
        title: Text(
          'BottomNav',
          style: TextStyle(fontSize: 16),
        ),
      ),
      // ),
      // ページビュー
      body: PageView(
          controller: _pageController,
          // ページ切り替え時に実行する処理
          // PageViewのonPageChangedはページインデックスを受け取る
          // 以下ではページインデックスをindexとする
          onPageChanged: (index) {
            setState(() {
              // ページインデックスを更新
              _screen = index;
            });
          },
          // ページ下部のナビゲーションメニューに相当する各ページビュー。後述
          children: [
            BookScreen(),
            CloudScreen(),
            CakeScreen(),
          ]),
      // ページ下部のナビゲーションメニュー
      bottomNavigationBar: BottomNavigationBar(
        // 現在のページインデックス
        currentIndex: _screen,
        // onTapでナビゲーションメニューがタップされた時の処理を定義
        onTap: (index) {
          setState(() {
            // ページインデックスを更新
            _screen = index;

            // ページ遷移を定義。
            // curveで指定できるのは以下
            // https://api.flutter.dev/flutter/animation/Curves-class.html
            _pageController.animateToPage(index,
                duration: Duration(milliseconds: 300), curve: Curves.easeOut);
          });
        },
        // 定義済のナビゲーションメニューのアイテムリスト
        items: myBottomNavBarItems(),
      ),
    );
  }
}

SingleTickerProviderStateMixinを使用していますが、これについては以下が大変参考になりました。

medium.com

AnimationControllerの扱い方も手厚く解説 📝

また、ページ切替時のアニメーションの挙動については、animateToPageのオプションで指定しています。Durationで遷移にかける時間、curveで挙動を指定できます。このcurveについては、以下の公式ドキュメントにどのようなものを指定できてそれぞれどのような挙動かまとまっています。

api.flutter.dev

A collection of common animation curves.

ナビゲーションメニューに対応するビューのコード

あとは、アプリ下部のナビゲーションメニューに対応するページビューを3つ用意します。ここでは、適当にpagesという名前のディレクトリをlib配下に作成し、そこにpages/BookScreen.dartpages/CloudScreen.dartpages/CakeScreen.dartを作成しました。なお、これら3つはほぼ全て同じ内容で色やアイコンを変更しているだけです。

pages/BookScreen.dart
import 'package:flutter/material.dart';

class BookScreen extends StatelessWidget {
  // This widget is the root of your application.
  
  Widget build(BuildContext context) {
    return Scaffold(
        backgroundColor: Colors.green[100],
        // Appbar
        appBar: AppBar(
          backgroundColor: Colors.green[100],
          title: Text(
            'Book',
            style: TextStyle(fontSize: 16),
          ),
        ),
        body: Center(child: Icon(Icons.book)));
  }
}

以下はpages/CloudScreen.dartです。

pages/CloudScreen.dart
import 'package:flutter/material.dart';

class CloudScreen extends StatelessWidget {
  // This widget is the root of your application.
  
  Widget build(BuildContext context) {
    return Scaffold(
        backgroundColor: Colors.blue[100],
        // Appbar
        appBar: AppBar(
          backgroundColor: Colors.blue[100],
          title: Text(
            'Cloud',
            style: TextStyle(fontSize: 16),
          ),
        ),
        body: Center(child: Icon(Icons.cloud)));
  }
}

以下はpages/CakeScreen.dartです。

pages/CakeScreen.dart
import 'package:flutter/material.dart';

class CakeScreen extends StatelessWidget {
  // This widget is the root of your application.
  
  Widget build(BuildContext context) {
    return Scaffold(
        backgroundColor: Colors.pink[100],
        // Appbar
        appBar: AppBar(
          backgroundColor: Colors.pink[100],
          title: Text(
            'Cake',
            style: TextStyle(fontSize: 16),
          ),
        ),
        body: Center(child: Icon(Icons.cake)));
  }
}

まとめ

アプリ下部に表示する基本的なナビゲーションメニューを実装しました。

関連記事
開発アプリ

nanolog.app

毎日の小さな出来事をなんでも記録して、ログとして残すためのライフログアプリです。