Nextcloud Hub(Nextcloud 18)をUbuntu + Nginx + MySQL環境で構築する手順
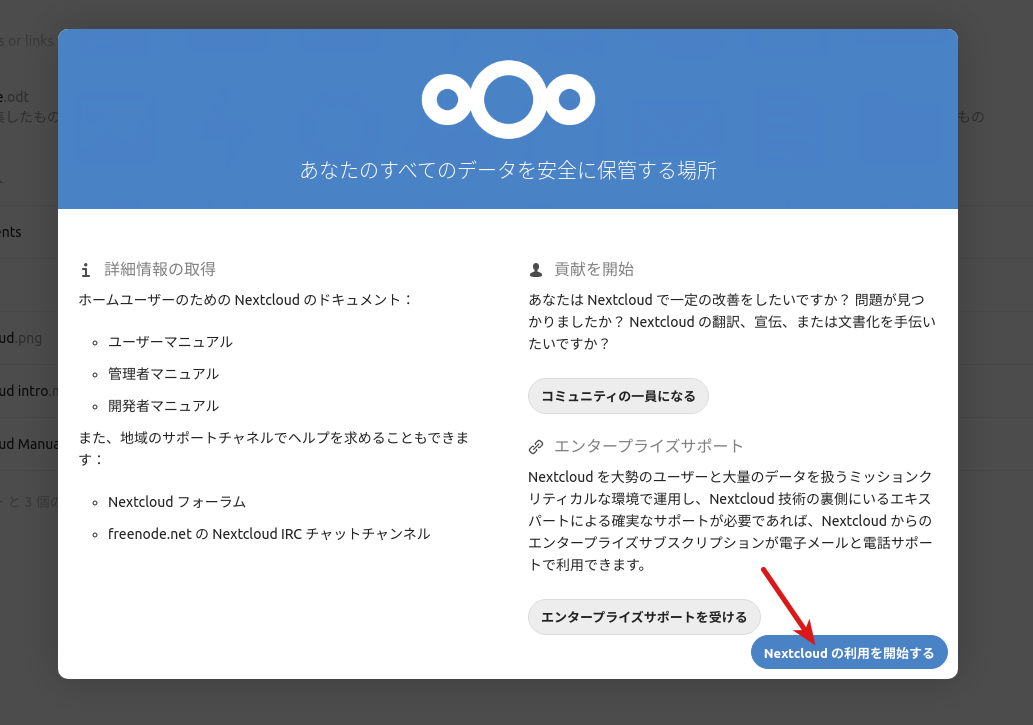
 Image Credit : Nextcloud
はじめに
Nextcloud Hubは最新のNextcloud 18の呼び名です。Nextcloud Hubの機能については以下に簡単にまとめました。
Nextcloudはファイル共有サーバーとして始まり今ではビデオチャット機能やカレンダー機能等、非常に多くの機能を持つオープンソースソフトウェアです。そして2020年1月17日に新しく「Nextcloud Hub」を発表しました。
Nextcloudのインストール方法として、Snap形式やDocker形式での方法も用意されており、これらのインストール方法のほうがとても簡単です。ただ、Snap形式、Docker形式のインストールでは最新のNextcloudでなく少し古いバージョンになります。従って今回のように最新のNextcloudを使用したい場合は、Nextcloudのパッケージからゼロからインストールする必要があります。 この記事では、執筆時点で最新のNextcloud 18 (以降ではNextcloud Hubと呼びます。)をUbuntu + Nginx + MySQL環境で構築する手順をまとめます。
前提と環境
以下の環境でNextcloud Hubを構築しました。NginxやMySQLはインストール済とします。
- OS : Ubuntu 18.04
- Webサーバ : Nginx 1.17
- データベース : MySQL 5.7
- 独自ドメインは取得済とします。この記事では、
example.comを例として使用します。 - 独自ドメインのSSL証明書は取得済とします。ここでは、Let's Encryptによる証明書を取得済として説明します。
Nextcloud Hubを動作させるには、以下の環境が必要となります。
- サーバーのメモリが最低128MB以上。推奨は512MB以上
- PHP7.1 以上
必要なパッケージをインストールする
はじめにNextcloud Hubの構築に必要となるパッケージをaptでインストールします。Nextcloud HubはPHPで開発されており、以下でインストールするのはPHP用のモジュールになります。
$ sudo apt update
$ sudo apt install php7.2 php7.2-fpm
$ sudo apt install php7.2-gd php7.2-json php7.2-mysql php7.2-curl php7.2-mbstring
$ sudo apt install php7.2-intl php-imagick php7.2-xml php7.2-zip
以上で必要なパッケージのインストールが完了です。
Nextcloud Hubをダウンロードする
Nextcloud Hubを公式ダウンロードページからダウンロードします。
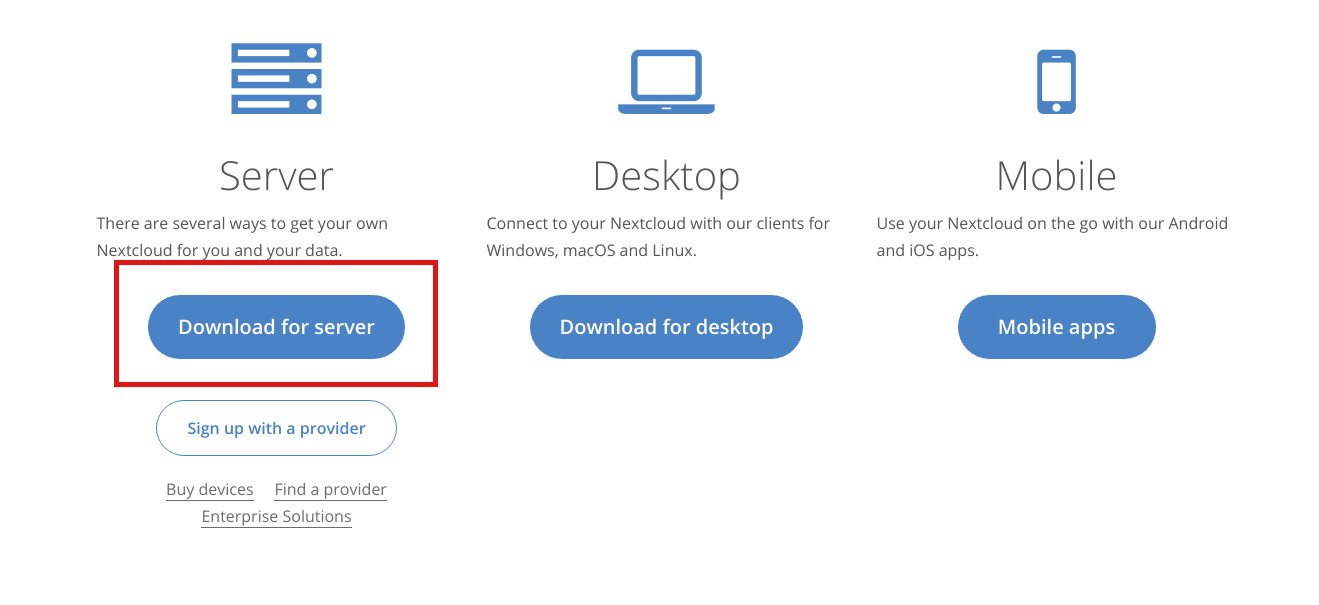
以下のように「Download Nextcloud」をクリックします。zip形式でダウンロードされます。
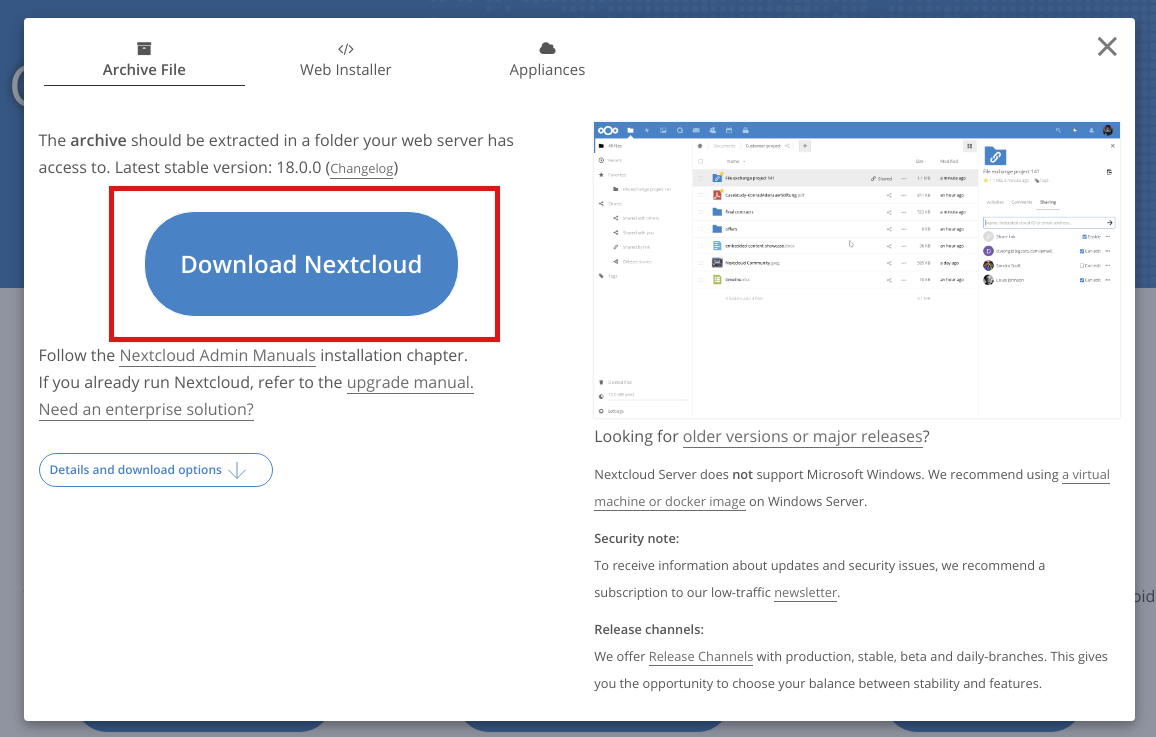
もしtar形式が良い場合は、以下のように「Details and download options」からtar形式をダウンロード可能です。
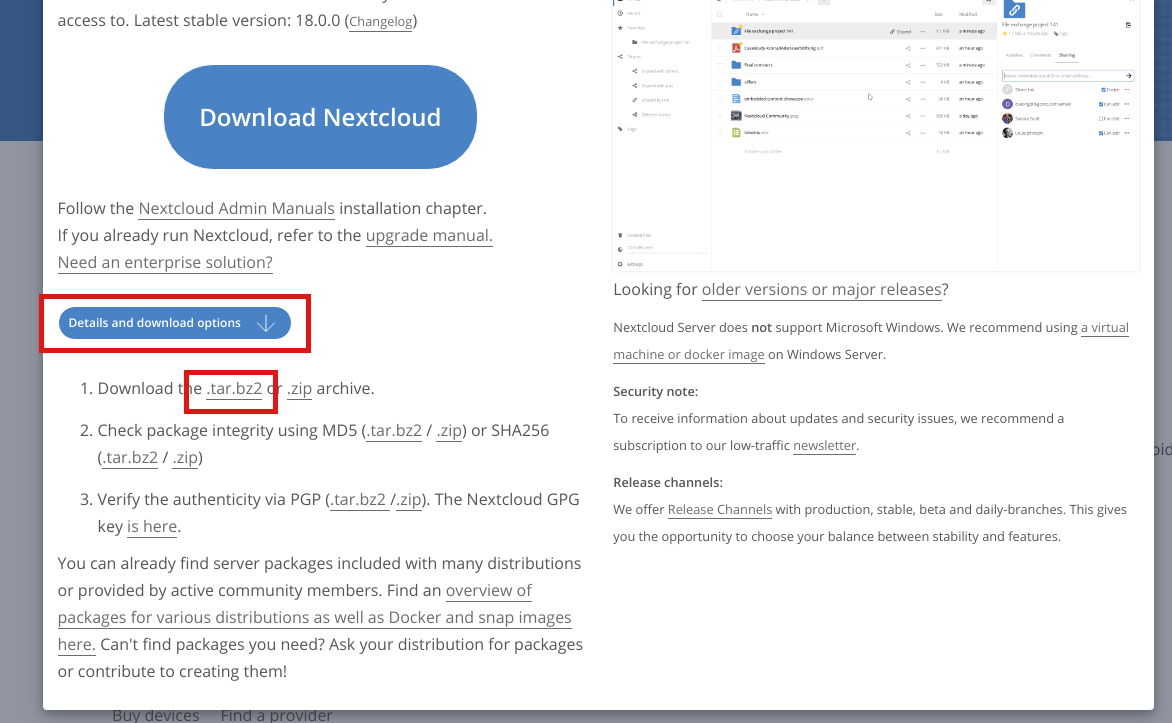
この記事では、zip形式で進めます。 以上でNextcloud Hubのダウンロードが完了です。
ダウンロードファイルを検証する
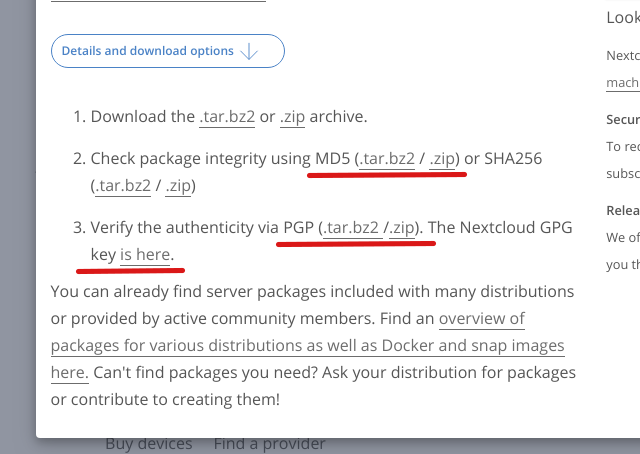
公式ドキュメントに記載の手順に従って、ダウンロードしたzipファイルが不正なものでないかをMD5を使用して検証します。この手順とここでダウンロードするMD5、PGP用のファイルのリンクは、以下のようにNextcloudの公式ダウンロードページに記載されているものです。
MD5用のファイルをダウンロードします。以下のhttps://download.nextcloud.com/server/releases/nextcloud-18.0.0.zip.md5は現時点での最新版のバージョンです。
$ wget https://download.nextcloud.com/server/releases/nextcloud-18.0.0.zip.md5
MD5を使って以下で検証します。
$ md5sum -c nextcloud-18.0.0.zip.md5 < nextcloud-18.0.0.zip
以下のようにOKと表示されれば検証が通り完了です。
$ md5sum -c nextcloud-18.0.0.zip.md5 < nextcloud-18.0.0.zip
nextcloud-18.0.0.zip: OK
続いてPGP用のファイルをダウンロードします。
$ wget https://download.nextcloud.com/server/releases/nextcloud-18.0.0.zip.asc
検証用のKeyをダウンロードします。
$ wget https://nextcloud.com/nextcloud.asc
以下で検証を実行します。
$ gpg --import nextcloud.asc
$ gpg --verify nextcloud-18.0.0.zip.asc nextcloud-18.0.0.zip
以下が実行結果です。
$ gpg --verify nextcloud-18.0.0.zip.asc nextcloud-18.0.0.zip
gpg: Signature made Fri 17 Jan 2020 10:52:24 PM JST
gpg:                using RSA key D7533838A724938C
gpg: Good signature from "Nextcloud Security " [unknown]
gpg: WARNING: This key is not certified with a trusted signature!
gpg:          There is no indication that the signature belongs to the owner.
Primary key fingerprint: 2998 7B10 9XQ3 12I9 3857 264T D758 99B9 A724 127L
Good signatureと出ていれば改ざんされておらず正常であることを意味します。Warningが出ていますが、これらの意味については以下が参考になりました。
今回は、ビルドに必要なソースコードのファイルを入手して、それが真正なものであるかどうかを調べる方法を解説します(編集部)
不正でないことを確認できたら以下で解凍します。
$ unzip nextcloud-18.0.0.zip
解凍すると、nextcloudというディレクトリが作成されます。
以上で検証が完了です。
Nextcloud Hubのディレクトリに権限を付与する
解凍してできたnextcloudディレクトリを、適当なところに置きます。ここでは/var/www配下におきます。
$ sudo mv nextcloud /var/www/
また、現在のログインユーザ(ここではusernameとする)をユーザーグループのnginxに所属させ、移動したnextcloudディレクトリの権限をnginxに変更しておきます。
$ sudo usermod -aG nginx username
$ sudo chown -R nginx:nginx /var/www/nextcloud
なお、Nginxのユーザ名は/etc/nginx/nginx.confに以下のようにuser部分に記載されています。
user nginx;
php-fpmの設定を変更する
Nginx用にphp-fpmの設定を少しだけ変更します。具体的には、/etc/php/7.2/fpm/pool.d/www.confに設定ファイルのuser、group、listen.owner、listen.groupを全てnginxに変更します。以下のようになります。
; Unix user/group of processes
; Note: The user is mandatory. If the group is not set, the default user's group
;       will be used.
user = nginx
group = nginx

; 途中省略

; Set permissions for unix socket, if one is used. In Linux, read/write
; permissions must be set in order to allow connections from a web server. Many
; BSD-derived systems allow connections regardless of permissions.
; Default Values: user and group are set as the running user
;                 mode is set to 0660
listen.owner = nginx
listen.group = nginx
php-fpmとNginxの通信については以下に詳しくまとめられており大変参考になりました。
PHP の実行環境を構築する場合、ググると大体 nginx と PHP-FPM を設定し PHP の実行環境を構築する記事が沢山出てきます。インフラの知識がない頃、コピペでとりあえず PHP の実行環境を構築できたが...
Nextcloud Hub用にMySQLユーザとデータベースを作成する
MySQLにrootでログインします。
$ mysql -u root -p
Nextcloud Hub用にユーザーを作成します。ここではユーザ名をnextuserとし、そのパスワードをyourpasswordにします。各自置き換えてください。
mysql> CREATE USER 'nextuser'@'localhost' IDENTIFIED BY 'yourpassword';
続いてNextcloud Hubで使用するデータベースを適当な名前で作成します。ここではnext_dbというデータベース名にします。
mysql> create database next_db;
作成したユーザnextuserがデータベースnext_dbを扱えるように権限を付与します。
mysql> grant all privileges on next_db.* to 'nextuser'@'localhost';
以上でNextcloud Hub用のMySQLユーザとデータベースの作成が完了です。ここで作成したユーザ情報をデータベース名を後ほど使用します。
Nginxの設定ファイルを変更する
Nextcloud Hub用に、Nginxの設定ファイル置き場である/etc/nginx/conf.dにexample.com.confという名前で設定ファイルを作成します。そしてその中身を以下のようにします。
upstream php-handler {
    #server 127.0.0.1:9000;
    server unix:/var/run/php/php7.2-fpm.sock;
}

server {
    listen 80;
    listen [::]:80;
    server_name example.com;
    # enforce https
    return 301 https://$server_name:443$request_uri;
}

server {
    listen 443 ssl http2;
    listen [::]:443 ssl http2;
    server_name example.com;

    # Let's Encryptの設定
    ssl_certificate /etc/letsencrypt/live/example.com/fullchain.pem;
    ssl_certificate_key /etc/letsencrypt/live/example.com/privkey.pem;

    # Add headers to serve security related headers
    # Before enabling Strict-Transport-Security headers please read into this
    # topic first.
    #add_header Strict-Transport-Security "max-age=15768000; includeSubDomains; preload;" always;
    #
    # WARNING: Only add the preload option once you read about
    # the consequences in https://hstspreload.org/. This option
    # will add the domain to a hardcoded list that is shipped
    # in all major browsers and getting removed from this list
    # could take several months.
    add_header Referrer-Policy "no-referrer" always;
    add_header X-Content-Type-Options "nosniff" always;
    add_header X-Download-Options "noopen" always;
    add_header X-Frame-Options "SAMEORIGIN" always;
    add_header X-Permitted-Cross-Domain-Policies "none" always;
    add_header X-Robots-Tag "none" always;
    add_header X-XSS-Protection "1; mode=block" always;

    # Remove X-Powered-By, which is an information leak
    fastcgi_hide_header X-Powered-By;

    # Path to the root of your installation
    # nextcloudディレクトリのパスを指定
    root /var/www/nextcloud;

    location = /robots.txt {
        allow all;
        log_not_found off;
        access_log off;
    }

    # The following 2 rules are only needed for the user_webfinger app.
    # Uncomment it if you're planning to use this app.
    #rewrite ^/.well-known/host-meta /public.php?service=host-meta last;
    #rewrite ^/.well-known/host-meta.json /public.php?service=host-meta-json last;

    # The following rule is only needed for the Social app.
    # Uncomment it if you're planning to use this app.
    #rewrite ^/.well-known/webfinger /public.php?service=webfinger last;

    location = /.well-known/carddav {
      return 301 $scheme://$host:$server_port/remote.php/dav;
    }
    location = /.well-known/caldav {
      return 301 $scheme://$host:$server_port/remote.php/dav;
    }

    # set max upload size
    client_max_body_size 512M;
    fastcgi_buffers 64 4K;

    # Enable gzip but do not remove ETag headers
    gzip on;
    gzip_vary on;
    gzip_comp_level 4;
    gzip_min_length 256;
    gzip_proxied expired no-cache no-store private no_last_modified no_etag auth;
    gzip_types application/atom+xml application/javascript application/json application/ld+json application/manifest+json application/rss+xml application/vnd.geo+json application/vnd.ms-fontobject application/x-font-ttf application/x-web-app-manifest+json application/xhtml+xml application/xml font/opentype image/bmp image/svg+xml image/x-icon text/cache-manifest text/css text/plain text/vcard text/vnd.rim.location.xloc text/vtt text/x-component text/x-cross-domain-policy;

    # Uncomment if your server is build with the ngx_pagespeed module
    # This module is currently not supported.
    #pagespeed off;

    location / {
        rewrite ^ /index.php;
    }

    location ~ ^\/(?:build|tests|config|lib|3rdparty|templates|data)\/ {
        deny all;
    }
    location ~ ^\/(?:\.|autotest|occ|issue|indie|db_|console) {
        deny all;
    }

    location ~ ^\/(?:index|remote|public|cron|core\/ajax\/update|status|ocs\/v[12]|updater\/.+|oc[ms]-provider\/.+)\.php(?:$|\/) {
        fastcgi_split_path_info ^(.+?\.php)(\/.*|)$;
        set $path_info $fastcgi_path_info;
        try_files $fastcgi_script_name =404;
        include fastcgi_params;
        fastcgi_param SCRIPT_FILENAME $document_root$fastcgi_script_name;
        fastcgi_param PATH_INFO $path_info;
        fastcgi_param HTTPS on;
        # Avoid sending the security headers twice
        fastcgi_param modHeadersAvailable true;
        # Enable pretty urls
        fastcgi_param front_controller_active true;
        fastcgi_pass php-handler;
        fastcgi_intercept_errors on;
        fastcgi_request_buffering off;
    }

    location ~ ^\/(?:updater|oc[ms]-provider)(?:$|\/) {
        try_files $uri/ =404;
        index index.php;
    }

    # Adding the cache control header for js, css and map files
    # Make sure it is BELOW the PHP block
    location ~ \.(?:css|js|woff2?|svg|gif|map)$ {
        try_files $uri /index.php$request_uri;
        add_header Cache-Control "public, max-age=15778463";
        # Add headers to serve security related headers (It is intended to
        # have those duplicated to the ones above)
        # Before enabling Strict-Transport-Security headers please read into
        # this topic first.
        #add_header Strict-Transport-Security "max-age=15768000; includeSubDomains; preload;" always;
        #
        # WARNING: Only add the preload option once you read about
        # the consequences in https://hstspreload.org/. This option
        # will add the domain to a hardcoded list that is shipped
        # in all major browsers and getting removed from this list
        # could take several months.
        add_header Referrer-Policy "no-referrer" always;
        add_header X-Content-Type-Options "nosniff" always;
        add_header X-Download-Options "noopen" always;
        add_header X-Frame-Options "SAMEORIGIN" always;
        add_header X-Permitted-Cross-Domain-Policies "none" always;
        add_header X-Robots-Tag "none" always;
        add_header X-XSS-Protection "1; mode=block" always;

        # Optional: Don't log access to assets
        access_log off;
    }

    location ~ \.(?:png|html|ttf|ico|jpg|jpeg|bcmap)$ {
        try_files $uri /index.php$request_uri;
        # Optional: Don't log access to other assets
        access_log off;
    }
}
上記の設定内容は、こちらの公式マニュアルの内容を引用しています。上記のうち、独自ドメインのexample.comとNextcloud Hubのディレクトリのパス/var/www/nextcloudを各自の環境に合わせて置換してください。また、上記ではSSL証明書をLet's Encryptで取得した前提となっているため、もし違う方法でSSL証明書を取得している場合などは以下を編集してください。
# Let's Encryptの設定
ssl_certificate /etc/letsencrypt/live/example.com/fullchain.pem;
ssl_certificate_key /etc/letsencrypt/live/example.com/privkey.pem;
Nextcloud Hubを起動する
以下で起動できます。
$ sudo service php7.2-fpm start
$ sudo service nginx start
Nextcloud Hubにアクセスして設定をおこなう
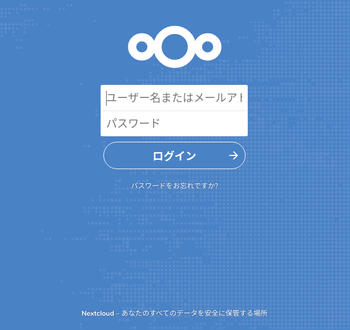
最後に、ブラウザからexample.comにアクセスし設定を完了させます。example.comにアクセスすると、以下のような設定画面が表示されると思います。
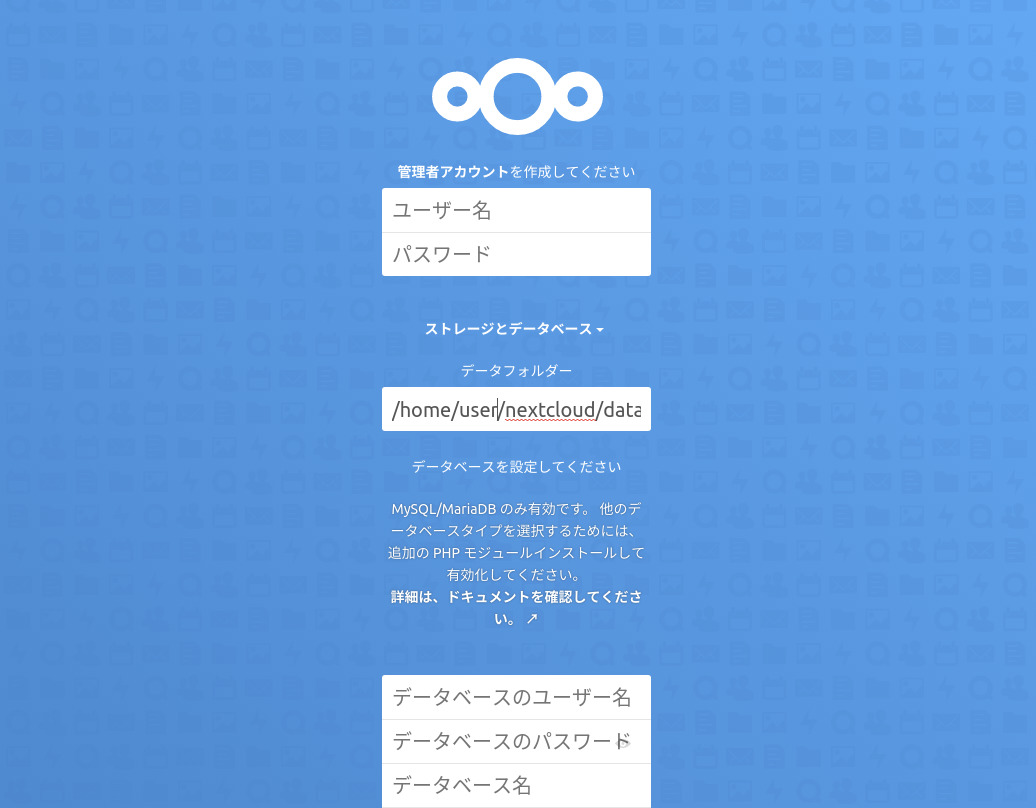
もし上記の画面が表示されない場合は、Nginxが起動しているかを確認してみてください。また、/var/log/nginx/error.logにエラーが記録されていないかも確認してみてください。
上記の設定画面で、Nextcloud用に適当な管理者ユーザ名とパスワードを入力します。そして同じページ内に以下のようにデータベース情報の入力フォームがあるので、ここに先程作成したデータベース名、ユーザ名を入力します。
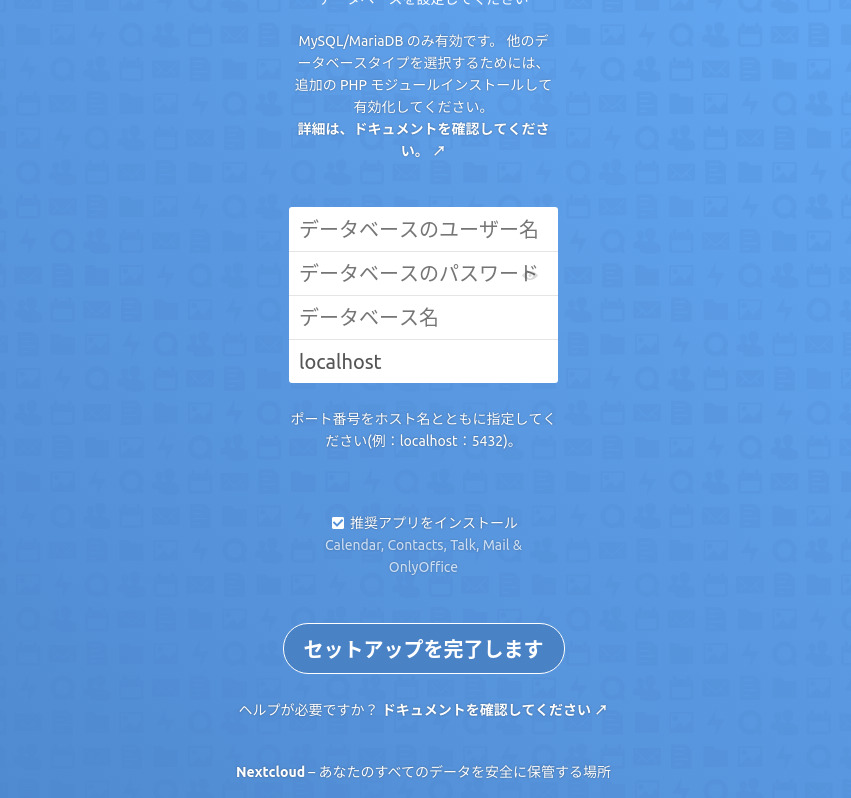 具体的には以下のようになります。
| 項目 | 内容 |
|---|---|
| データベースのユーザー名 | Nextcloud用に作成したユーザ名。この記事だとnextuserが該当。 |
| データベースのパスワード | Nextcloud用に作成したユーザ名に対応するパスワード。この記事だとyourpasswordが該当。 |
| データベース名 | Nextcloud用に作成したデータベース名。この記事だとnext_dbが該当。 |
| ホスト名 | Nextcloud用のデータベースが稼働するホスト名。この記事ではNextcloudとそれ用のデータベースは同じサーバーで動くのでlocalhostのままでOK。 |
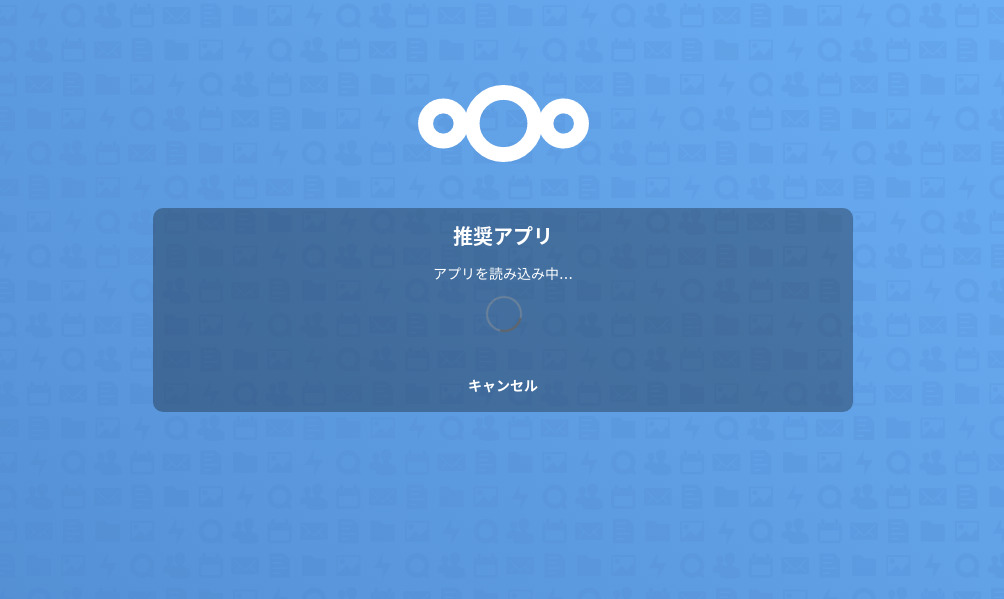
上記を入力後、「セットアップを完了します」をクリックします。すると、以下のようにNextcloud Hubの設定が進むので少々待機します。
セットアップが完了すると、以下のようにWelcomeメッセージが表示されます。最後に「Nextcloudの利用を開始する」をクリックすれば全ての作業が完了です。
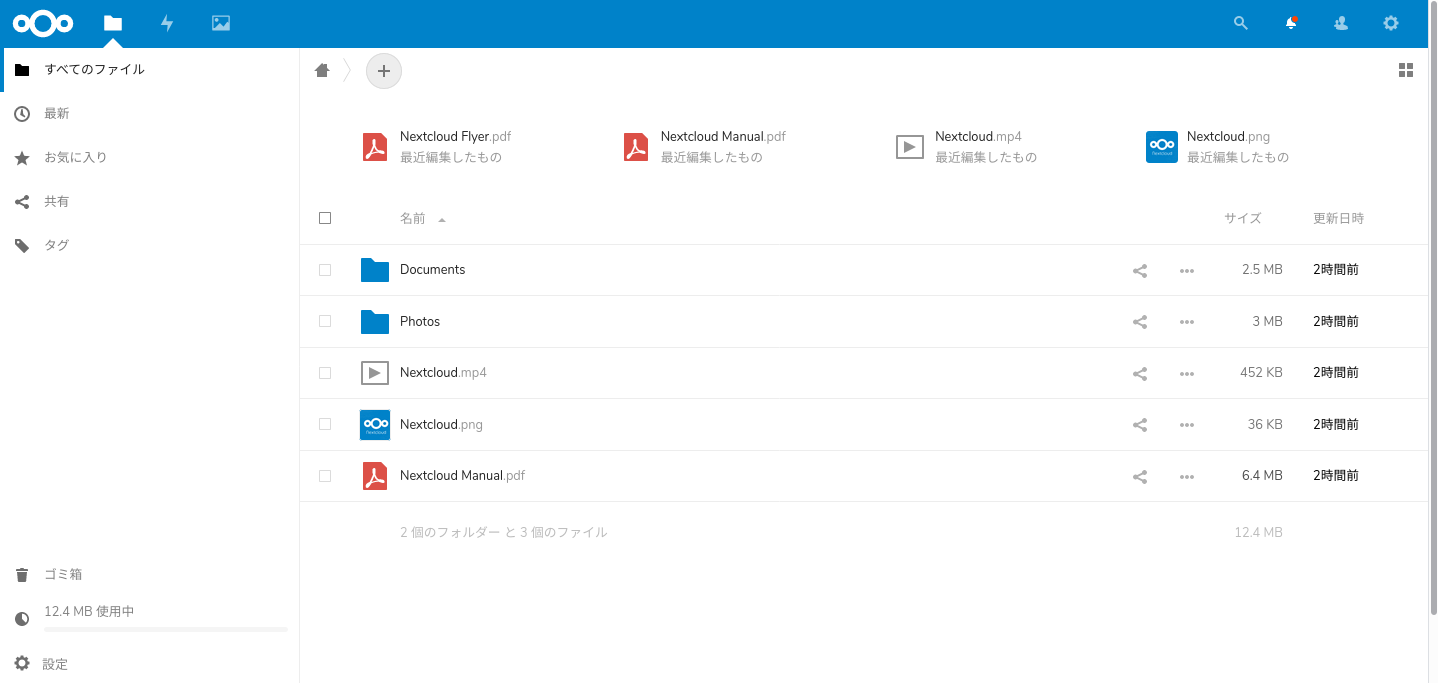
以下のようにNextcloudのダッシュボードが表示されます。
まとめ
NextcloudをUbuntu + Nginx + MySQL環境で構築する手順をまとめました。Nextcloudのクライアントアプリのインストール方法については以下にまとめています。
NextcloudのクライアントアプリをWindows10、Linuxにそれぞれインストールしたのでその手順をメモしておきます。
また、もし最新のNextcloudでなくても良い場合は、Snap版のインストールが簡単です。
Nextcloudは自前でGoogleドライブのようなサービスを構築できるオープンソースソフトウェアです。この記事では、Nginxをリバースプロキシとして使いNextcloudを動作させる環境の構築手順をまとめます。
関連記事
 公開日:2020/01/18 更新日:2020/01/18
Nextcloudが「Nextcloud Hub」を発表。GoogleドキュメントやMicrosoft 365のようなコラボレーション機能を強化
Nextcloudはファイル共有サーバーとして始まり今ではビデオチャット機能やカレンダー機能等、非常に多くの機能を持つオープンソースソフトウェアです。そして2020年1月17日に新しく「Nextcloud Hub」を発表しました。
 公開日:2020/01/08 更新日:2020/01/08
NextcloudのクライアントアプリをWindows10、Linuxにインストールする
NextcloudのクライアントアプリをWindows10、Linuxにそれぞれインストールしたのでその手順をメモしておきます。
- 公開日:2020/01/08 更新日:2020/01/08
Nextcloudのsnap版をNginxのリバースプロキシとサブディレクトリ構成で使う
Nextcloudは自前でGoogleドライブのようなサービスを構築できるオープンソースソフトウェアです。この記事では、Nginxをリバースプロキシとして使いNextcloudを動作させる環境の構築手順をまとめます。
 公開日:2018/08/20 更新日:2018/08/20
NextcloudをDockerで構築する手順
プライベートなDropbox環境を構築することができるOwnCloudですが、OwnCloudから派生したNextcloudが開発されています。 このNextcloudを実際に触って使ってみるために、Dockerを使って環境構築したのでその手順をメモします。